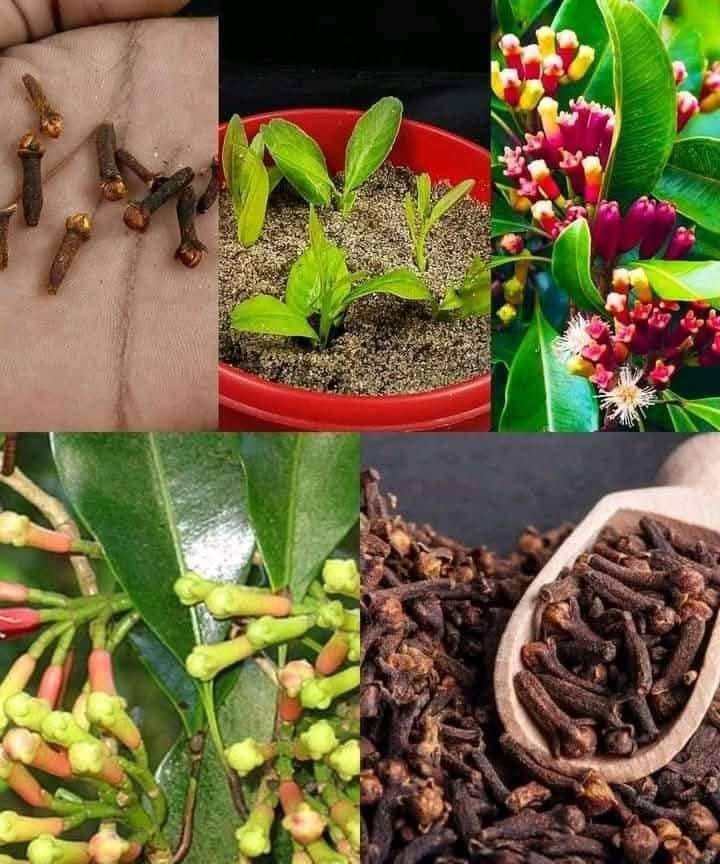
Cloves (Syzygium aromaticum) are a versatile and aromatic spice used in both culinary and medicinal applications. Known for their rich, warm flavor, cloves are an essential ingredient in various dishes, teas, and natural remedies. Cultivating your own cloves from seed is a rewarding experience, allowing you to harvest and enjoy this spice from the comfort of your home or garden. Whether you’re looking to spice up your meals or benefit from its medicinal properties, growing cloves can be both fun and beneficial.
Here’s a simple guide to cultivating cloves, from seed to spice, with step-by-step instructions to help you achieve successful results.
1. Selecting Clove Seeds:
The first step in cultivating cloves is choosing the right seeds:
- Fresh, High-Quality Seeds: When selecting clove seeds, ensure they are fresh, viable, and free from damage or mold. Fresh seeds have a better chance of germinating and growing into healthy plants.
- Source of Seeds: If possible, purchase seeds from a reputable source. Clove seeds can be tricky to find, so it’s important to obtain them from a nursery, garden store, or online supplier specializing in tropical or spice plants.
2. Germinating Clove Seeds:
Germinating clove seeds requires some preparation to ensure the seeds sprout successfully:
- Scarifying the Seeds: Clove seeds have a hard outer shell that can impede germination. To improve the chances of sprouting, gently nick the outer shell with a sharp knife or a small file. This process is known as scarification and helps the seed absorb water more efficiently.
- Soaking the Seeds: After scarifying, soak the seeds in warm water overnight (12-24 hours). The soaking process softens the seed coat, promoting faster and more successful germination.
3. Planting Clove Seeds:
Once the seeds are prepared, it’s time to plant them:
- Soil Type: Use a well-draining potting mix or sandy loam soil to sow the scarified seeds. Cloves prefer a slightly acidic to neutral pH, so make sure the soil is suitable for tropical plants.
- Planting Depth: Gently plant the seeds about 1/4 to 1/2 inch deep into small pots or seedling trays. Ensure the soil is kept moist but not soggy.
- Location: Place the planted seeds in a warm, humid location with indirect sunlight. A spot near a window with filtered light or under a grow light works well. Cloves need warmth to germinate, so temperatures around 75-85°F (24-29°C) are ideal.
4. Caring for Clove Seedlings:
Once your clove seeds have germinated, it’s essential to provide proper care to promote healthy growth:
- Light: Clove seedlings need bright, indirect sunlight to thrive. Avoid direct sunlight, as it can scorch the young plants.
- Watering: Keep the soil consistently moist but not waterlogged. Water the seedlings regularly, allowing the top inch of soil to dry out slightly between waterings. Ensure good drainage to prevent root rot.
- Temperature: Cloves are tropical plants that thrive in warm temperatures. Maintain a steady temperature of 70-85°F (21-29°C) for optimal growth.
- Fertilizing: Use a balanced, water-soluble fertilizer once a month to encourage strong, healthy growth. A fertilizer with equal parts nitrogen, phosphorus, and potassium works well.
5. Harvesting Cloves:
Cloves are harvested for their flower buds, which are the aromatic spice we use in cooking:
- Timing: Harvest the flower buds just before they open. The buds should be pinkish in color, as this is when they contain the most flavor and aroma. If you wait too long, the buds will open, and the flavor will diminish.
- Pruning: Use sharp pruning shears to carefully cut the flower buds from the tree. Be gentle when harvesting, as the buds should be removed without damaging the surrounding plant.
6. Drying and Storing Cloves:
After harvesting the cloves, they need to be dried to preserve their flavor and aroma:
- Drying Process: Lay the harvested flower buds on a tray or screen in a warm, dry, and well-ventilated area. Ensure that the cloves are spread out in a single layer to promote even drying. This process may take 3-5 days.
- Checking for Dryness: The cloves are ready when they turn dark brown and become hard to the touch. Properly dried cloves will have a strong, aromatic scent and a brittle texture.
- Storage: Once dried, store your cloves in an airtight container in a cool, dry place, away from direct sunlight. When stored properly, cloves can maintain their flavor for months or even years.
Conclusion: Successfully Grow Lemon Trees:
By following these simple steps for clove cultivation—from seed preparation and germination to harvesting and drying—you can successfully grow your own cloves and enjoy their rich, spicy flavor in your cooking and medicinal applications. Whether you’re adding a unique touch to your meals or using cloves for their health benefits, growing cloves from cuttings or seeds offers the satisfaction of cultivating this valuable spice at home.
With patience, attention to detail, and the right environment, you can cultivate your own clove trees and enjoy fresh, aromatic spices for years to come. Happy planting!
