How to Build a Rain Barrel: A Step-by-Step Guide
Building a rain barrel is a simple and effective way to collect and store rainwater for future use in your garden, lawn, or even for non-potable household purposes. It’s an eco-friendly way to conserve water, reduce your water bill, and help with drought-resistant gardening. Here’s a step-by-step guide on how to build your own rain barrel using basic materials.
Materials Needed:
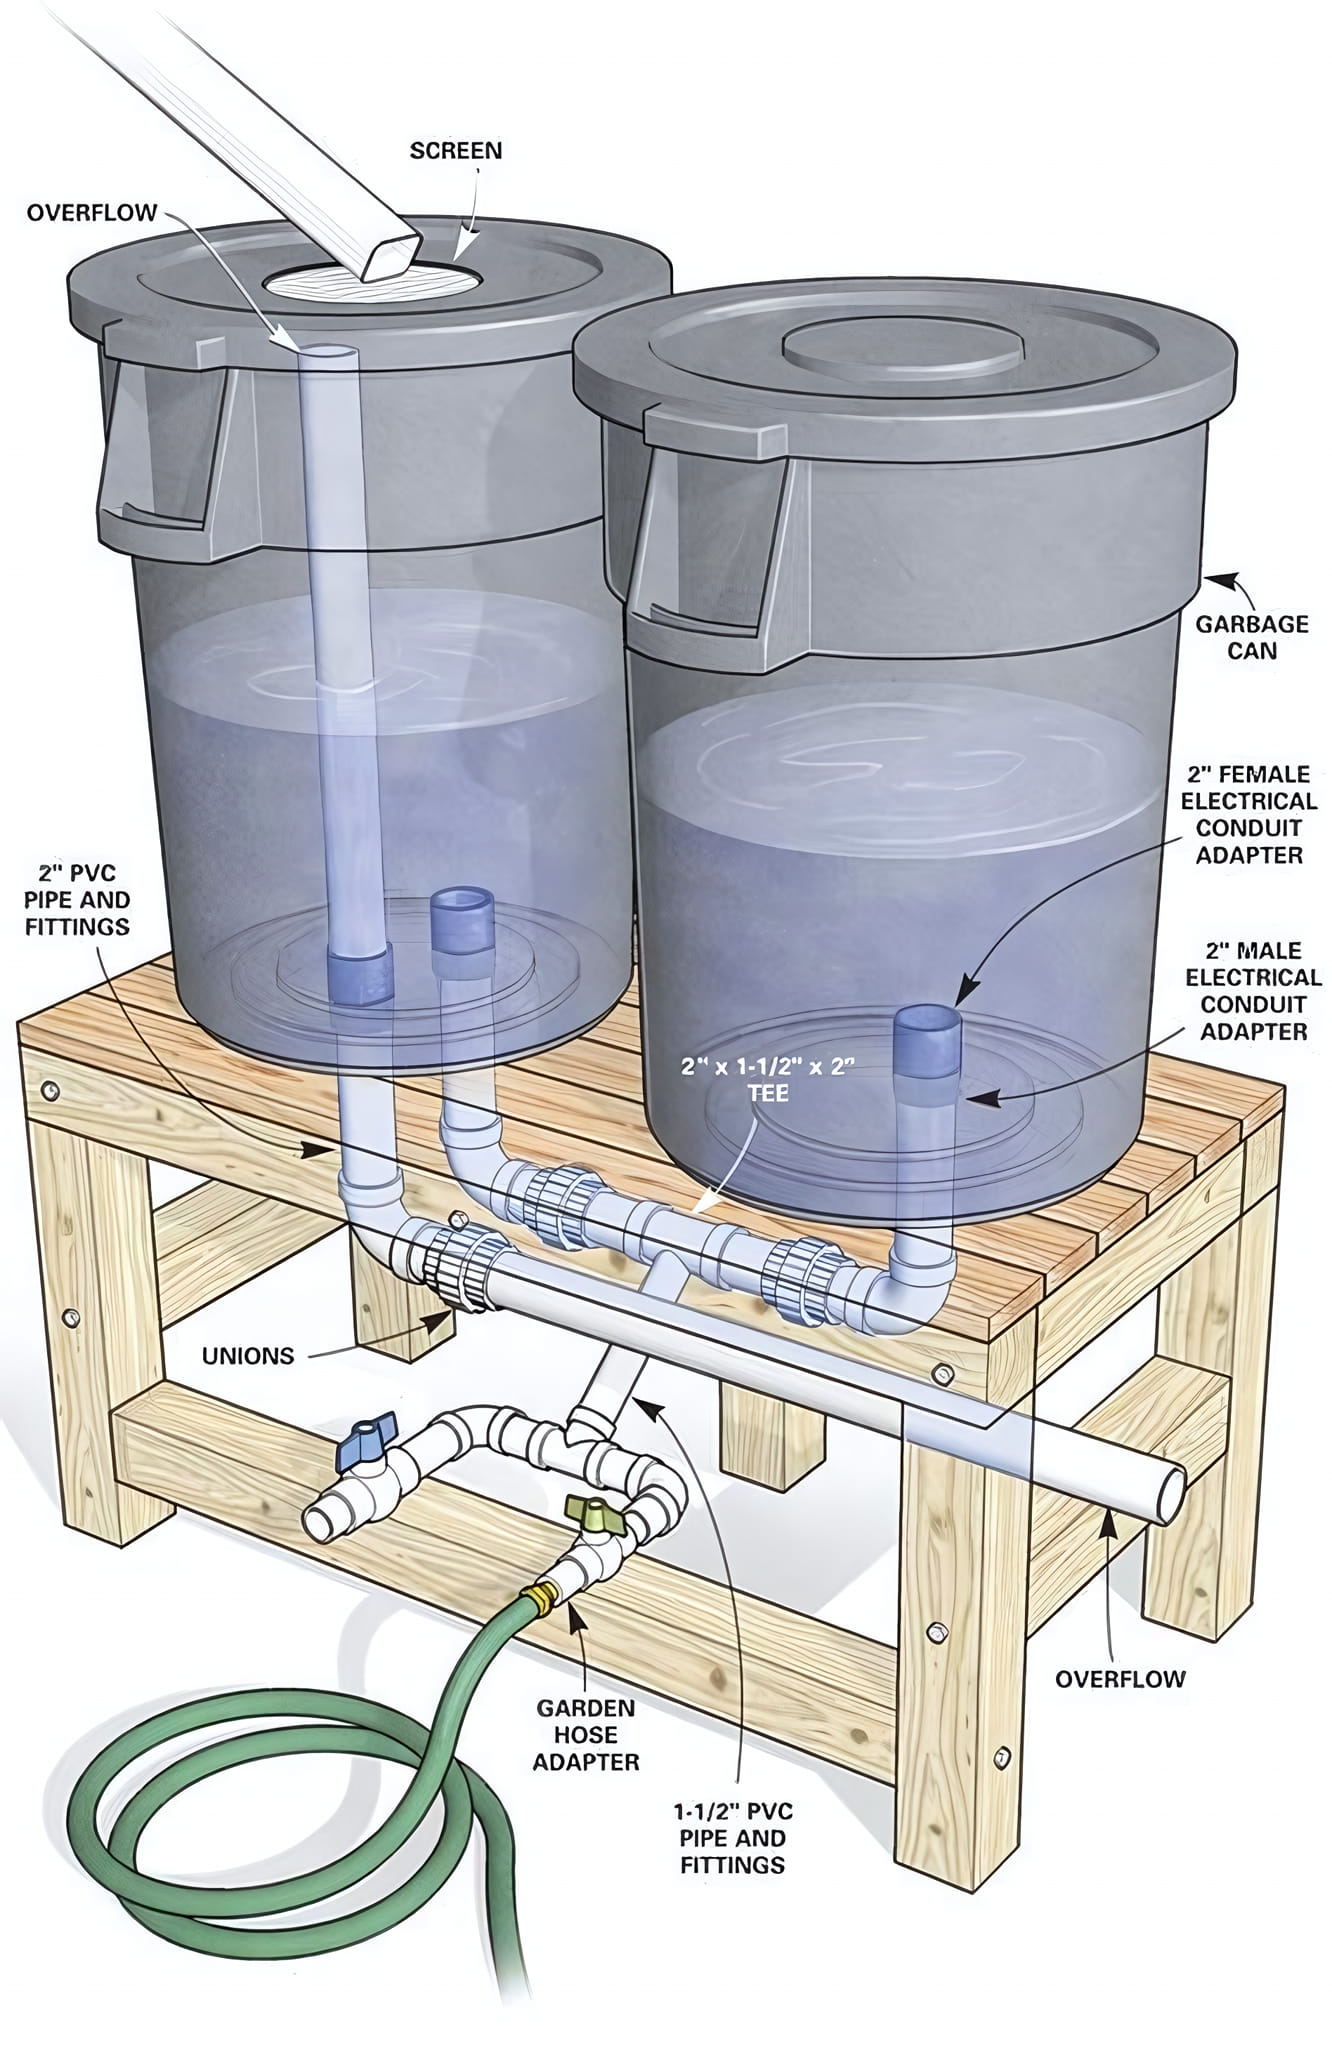
- 2 Large Garbage Cans (clean and food-safe if possible)
- 2” PVC Pipe and fittings
- 2” Female and Male Electrical Conduit Adapters
- 1 ½” PVC Pipe and fittings
- Garden Hose Adapter
- Unions for easy assembly and disassembly
- Overflow Pipe (to direct excess water)
- Mesh screen (for keeping debris out)
- Wooden Stand (for elevating the barrels)
- Tools: Drill, saw, PVC cutter, and PVC glue
Step-by-Step Instructions:
Step 1: Preparing the Cans
- Clean the Cans: Make sure the garbage cans are thoroughly cleaned and free from any chemicals or contaminants. You will be storing water in them, so they should be safe for use.
- Drill a Hole: Drill a hole in the bottom of one of the garbage cans to fit the 2” PVC male adapter. This will be used to attach the outlet pipe.
Step 2: Connecting the Cans
- Create the Overflow Hole: On the second garbage can, drill a hole near the top for the overflow pipe. This allows excess water to flow out and prevents the can from overflowing.
- Attach the PVC Pipe: Use PVC pipe and fittings to connect the two garbage cans. The 2” PVC pipe will run from the bottom of the first can to the second can. Ensure a secure fit with PVC glue.
- Install the Female and Male Adapters: Attach 2” female electrical conduit adapters to the top of each can and connect them with a 1 ½” PVC pipe. This pipe will direct rainwater into the barrels.
Step 3: Installing the Faucet and Hose Adapter
- Install the Faucet: On the bottom of the first barrel (the one at the base), install a garden hose adapter using 1 ½” PVC pipe. You will attach a faucet or spigot to this to allow easy access to the stored water.
- Seal the Connections: Use PVC glue to secure all connections and ensure they are watertight. Allow them to dry for at least 24 hours before use.
Step 4: Add the Mesh Screen
- Cover the Opening: Place a mesh screen over the opening at the top of the first barrel. This will help filter out leaves, debris, and insects, keeping the water clean.
- Secure the Screen: Attach the screen securely using a rubber band or other fastener, ensuring it stays in place even during rain.
Step 5: Set Up the Wooden Stand
- Build or Purchase a Wooden Stand: You’ll need a stand to elevate the rain barrel so that water can flow easily through the faucet. The stand should be sturdy and able to hold the weight of the filled rain barrel.
- Place the Barrels on the Stand: Position the barrels on the stand, ensuring they are level and stable. This will help gravity do its work, directing water towards the faucet.
Final Tips and Maintenance:
- Overflow: Direct the overflow pipe away from your home’s foundation to prevent water damage. It’s a good idea to place the overflow pipe in a garden bed or another part of your yard that benefits from the extra water.
- Water Quality: If you plan to use the rainwater for drinking or cooking, make sure to filter it further using proper water treatment methods.
- Clean the Mesh Screen: Regularly clean the mesh screen to prevent it from becoming clogged with debris.
- Winter Care: In freezing climates, disconnect and drain the rain barrel before the first freeze to prevent damage to the pipes and barrel.
Conclusion
Building a rain barrel is a great DIY project that can save you water and money while benefiting your garden. By following these steps, you can set up a simple rainwater collection system that will help you conserve water and ensure your plants stay hydrated during dry periods. Not only is it an eco-friendly solution, but it also provides a renewable water source that can be used for various household and garden needs. Happy building and harvesting rainwater! 🌧️🌿
