How to Build a Self-Watering Container Garden System 🌿💧
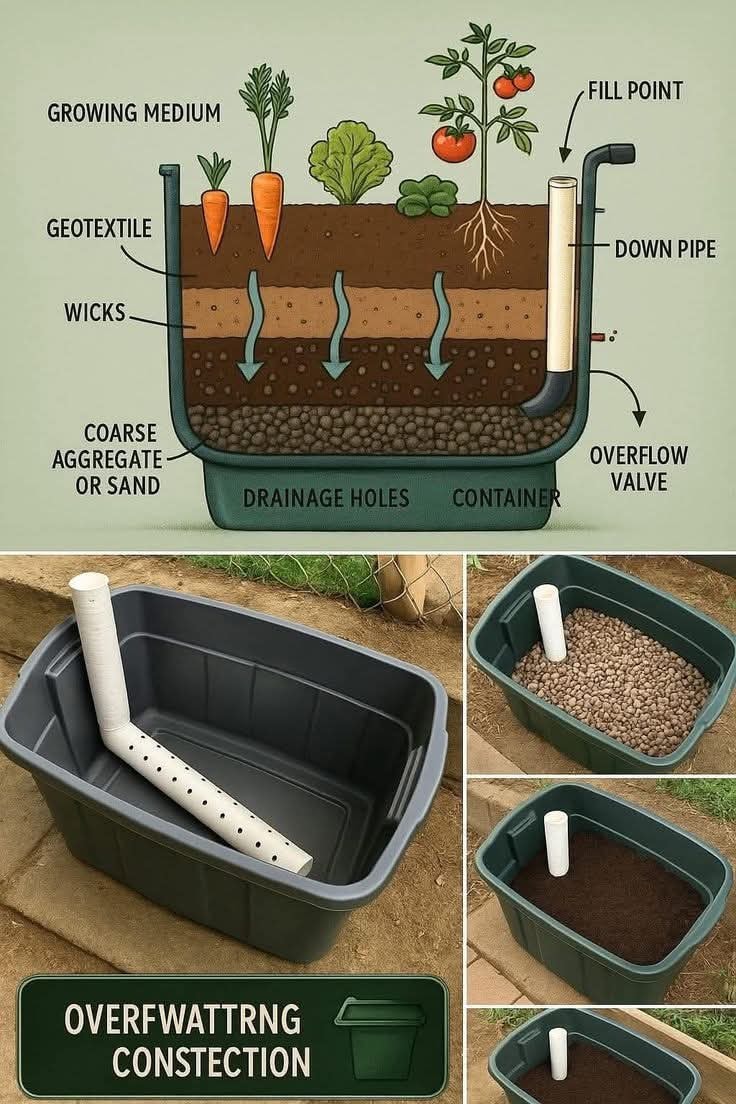
This clever setup is perfect for gardeners who want healthy plants with minimal maintenance. A self-watering container garden delivers consistent moisture directly to the roots, reducing the risk of overwatering or drying out. The design recycles water through capillary action (wicking) and can be built easily at home using affordable materials.
🪴 Materials You’ll Need:
- Large plastic storage container or tote (with lid optional)
- 1 PVC pipe (about 2–3 feet long) for the fill tube
- 1 piece of perforated pipe or a drilled section of PVC (for the water reservoir)
- Coarse gravel, pebbles, or sand (for the drainage layer)
- Landscape fabric or geotextile cloth
- Potting soil or growing medium
- A small drill
- Optional: an overflow valve or a small drilled hole about 2 inches from the bottom
⚙️ Step-by-Step Instructions:
1. Prepare the Container
Drill a small overflow hole about 2 inches from the bottom on one side of your container. This prevents water from rising too high and drowning the roots.
2. Create the Water Reservoir
Place a layer of coarse aggregate, gravel, or sand (about 2–3 inches deep) at the bottom. This forms the reservoir where water will collect.
3. Install the Fill Tube
Cut your PVC pipe at an angle on one end (to help water flow easily) and place it vertically into one corner of the container. This will serve as the fill point where you pour in water.
4. Add the Wick System
You can use fabric wicks, cotton ropes, or small cups filled with soil that reach into the gravel layer. These draw water upward through capillary action to keep the soil moist.
5. Separate Layers with Geotextile Fabric
Lay a piece of landscape fabric or geotextile cloth over the gravel layer. This prevents soil from falling into the reservoir while still allowing moisture to rise.
6. Add the Growing Medium
Fill the rest of the container with your potting mix or soil blend, leaving an inch or two of space at the top for watering. Mix compost for extra nutrients if you’re growing vegetables or herbs.
7. Plant Your Crops
Now plant your favorite vegetables, herbs, or flowers. Tomatoes, peppers, lettuce, spinach, and carrots thrive especially well in this type of setup.
8. Fill the Reservoir
Pour water through the fill tube until it starts to trickle from the overflow hole — this means the reservoir is full. Depending on the weather, you may only need to refill every few days.
💧 How It Works:
- Water fills the bottom reservoir.
- Wicks or soil columns draw moisture upward.
- The topsoil stays perfectly moist without being soggy.
- The overflow hole ensures no overwatering or root rot occurs.
🌱 Benefits of a Self-Watering Container:
- Saves water and time — perfect for busy gardeners.
- Prevents overwatering and promotes strong root growth.
- Ideal for hot climates or dry seasons.
- Works anywhere — balconies, patios, or even indoors.
Conclusion:
This simple self-watering container system combines science and sustainability to give you thriving plants with minimal effort. It keeps roots hydrated, reduces water waste, and makes gardening easy for everyone — whether you’re growing vegetables, herbs, or flowers. A smart garden solution for every home!
