DIY Rain Barrel Base: Simple, Sturdy, and Smart 💧🪵
Elevate your rain barrel the right way! Building a solid base using landscape blocks and gravel not only gives your rain barrel stability but also boosts efficiency by improving drainage and creating the perfect height for gravity-fed watering. This quick and easy project turns your rainwater harvesting system into a more functional and long-lasting setup.
🌿 Why Elevate Your Rain Barrel?
- Better water pressure: Elevation increases gravity flow, making it easier to fill watering cans or connect hoses.
- Improved drainage: Gravel prevents water from pooling under the barrel and reduces erosion.
- Enhanced stability: A solid base keeps your barrel level and safe, even when full (which can weigh over 400 lbs!).
🧱 Materials You’ll Need:
- 8–12 landscape blocks or bricks (depending on the size of your barrel)
- A few shovelfuls of gravel or crushed stone
- A level and measuring tape
- (Optional) A cinder block for extra height
- Your rain barrel with spigot and downspout connection
⚙️ Step-by-Step Instructions:
1. Choose a Level Spot
Pick a flat area near your downspout. Make sure it’s stable and won’t collect standing water.
2. Mark and Clear the Area
Mark the footprint of your rain barrel base and remove any grass or debris. Flatten the soil underneath to create an even surface.
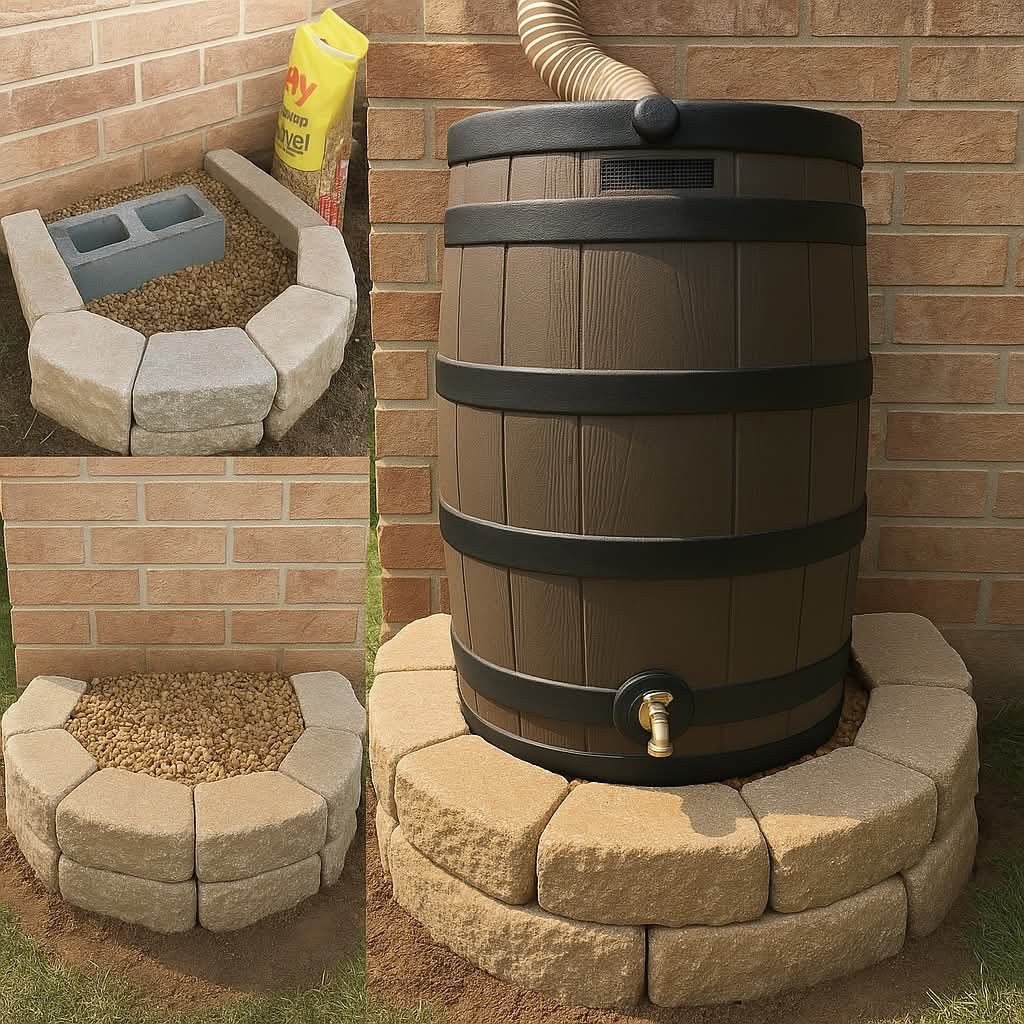
3. Add a Gravel Foundation
Pour a 2–3 inch layer of gravel or crushed stone into the cleared area. This helps with drainage and keeps the base dry. Level it out evenly.
4. Lay the Landscape Blocks
Arrange the landscape blocks or pavers in a circular or square shape. Stack two layers if you want extra height. Use a level to make sure the surface is perfectly flat — this is crucial for stability once the barrel is full.
5. Set the Barrel on Top
Carefully place your rain barrel on the finished base. Align it so the spigot faces forward for easy access. Attach the downspout extension to direct rainwater into the top.
6. Test and Adjust
Fill the barrel partially with water to test for leaks or wobbling. If needed, adjust the blocks or add more gravel to fix any uneven spots.
💧 Bonus Tips:
- Add a mesh screen to the top of your barrel to keep out leaves and mosquitoes.
- Place a small bucket or watering can under the spigot for easy collection.
- If you have multiple barrels, connect them with a hose to expand your rainwater capacity.
🌸 Conclusion:
This DIY rain barrel base project takes less than an hour but dramatically improves the efficiency and longevity of your rainwater system. It’s affordable, durable, and eco-friendly — giving you better water flow and a clean, stable setup that looks great in any garden! 🌿💦