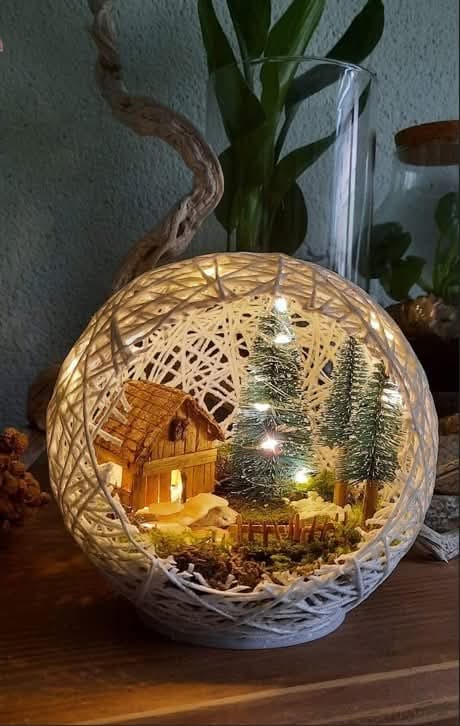
How to Make a Miniature Village in a Ball This Christmas:
Creating a miniature village inside a ball is a fun and creative holiday project that will bring a festive touch to your home. This simple craft involves using yarn, glue, and a few ornaments to create a charming scene that looks magical and unique. Here’s a step-by-step guide to making your own Christmas village in a ball.
Materials Needed:
- Balloons
- White glue
- Water
- Yarn (preferably thick)
- Scrap paper
- Moss
- Miniature Christmas ornaments (trees, houses, figurines, etc.)
- Paintbrush
- Needle (for deflating the balloon)
1. Inflate the Balloons:
Start by inflating your balloons to the size you prefer. These balloons will form the base of your miniature village, so choose a size that will give you enough space to work with for placing ornaments inside.
2. Mix Glue and Water:
In a bowl, mix white glue with water in a 1:1 ratio. This mixture will help the yarn stick to the balloons and form a sturdy structure once it dries.
3. Dip the Yarn in Glue:
Take the yarn and dip it into the glue-water mixture. Make sure the yarn is fully soaked in the glue mixture, but not too dripping wet. Then, start wrapping the yarn around the inflated balloon. Continue wrapping the yarn in different directions to cover the entire surface of the balloon. The yarn should be tightly packed to form a solid, durable layer.
4. Apply Another Layer of Glue:
Using a paintbrush, apply another layer of white glue over the wrapped yarn. This layer will help the yarn set and harden, ensuring the structure stays intact as it dries.
5. Let it Dry for 24 Hours:
Leave the balloon to dry for at least 24 hours. Ensure it is in a dry, well-ventilated area to speed up the drying process. It’s important that the yarn and glue are completely dry before moving on to the next step.
6. Deflate the Balloon:
Once the yarn and glue have dried, use a needle to carefully deflate the balloon. The yarn will retain its shape, forming a spherical frame that is perfect for your miniature village.
7. Create the Base and Add Decorations:
To complete the scene, create a base using scrap paper or a small cardboard piece. Add some moss to give the effect of snow or ground cover. Now, it’s time to place your miniature village items inside the yarn ball. You can add small Christmas trees, miniature houses, and any other holiday-themed items you find, preferably from a dollar store.
8. Display Your Miniature Village:
Your miniature village inside a ball is now ready! Display it on your mantel, table, or as part of your Christmas décor. This whimsical craft will add a festive, homemade touch to your holiday celebrations.
Tip: You can also add fairy lights inside the yarn ball to make the village even more magical when lit up.
Enjoy creating this charming little village, and have fun with the holiday spirit!
