Thanksgiving Cactus Propagation Guide
Learn how to turn a handful of Thanksgiving cactus stem segments into beautiful new houseplants, encourage healthy root development, choose the right propagation supplies and care for young plants as they establish.
Growing New Thanksgiving Cactus Plants From Cuttings
Thanksgiving cactus propagation is one of the most rewarding ways to multiply a favourite flowering houseplant. With its distinctive flattened green stems, pointed edges and spectacular seasonal flowers, the Thanksgiving cactus is an attractive addition to windowsills, plant shelves and indoor gardens.
Unlike many ordinary desert cacti, Thanksgiving cactus belongs to a group of tropical forest cacti. It naturally grows in environments where roots receive moisture alongside plenty of air. Understanding that difference is the secret to choosing a successful propagation method.
One healthy parent plant can provide several stem cuttings. Each suitable cutting has the potential to develop its own roots and eventually become an independent plant. With patience, a collection of small rooted segments can grow into an attractive, full container.
The simplest reliable method is to take healthy stem sections, allow any damaged tissue to dry briefly, insert the lower segment into a lightly moist, airy potting mix and provide bright indirect light. Roots commonly begin developing within several weeks, although temperature, plant condition and growing conditions affect the result.
Rooting powders, specialised cactus compost, perlite, propagation pots and gentle fertilisers are all products gardeners may consider. However, the right growing environment matters more than adding large quantities of treatment products.
This guide explains the complete process, including how to select cuttings, encourage roots, manage moisture, understand developing pink buds and choose suitable products without damaging delicate young roots.
Thanksgiving Cactus Plant and Project Overview
Common name: Thanksgiving cactus.
Botanical name: Schlumbergera truncata.
Plant family: Cactaceae.
Plant category: Tropical epiphytic cactus and flowering houseplant.
Propagation method: Stem segment cuttings.
Suitable location: Bright indoor windowsill, sheltered greenhouse or protected outdoor position in a suitable climate.
Preparation time: Approximately 10–15 minutes.
Hands-on planting time: Approximately 15–25 minutes for a small batch.
Initial rooting period: Often around 2–6 weeks under favourable conditions, sometimes longer.
Establishment period: Several additional weeks to months, depending on growth.
Best propagation season: Spring to early summer, particularly after flowering has finished.
Preferred light: Bright indirect light.
Suggested temperature: Approximately 18–24°C (64–75°F) for comfortable indoor rooting conditions.
Growing medium: Airy, moisture-retentive but free-draining potting mix.
Container: Small nursery pot with drainage holes.
Recommended cutting length: Two or three connected healthy stem segments.
Feeding: Generally unnecessary during initial rooting; begin light feeding only after active growth and root establishment.
Pet considerations: Thanksgiving cactus is generally regarded as non-toxic to cats and dogs, although chewing plant material can still cause digestive upset. Keep fertilisers and other gardening products away from pets and children.
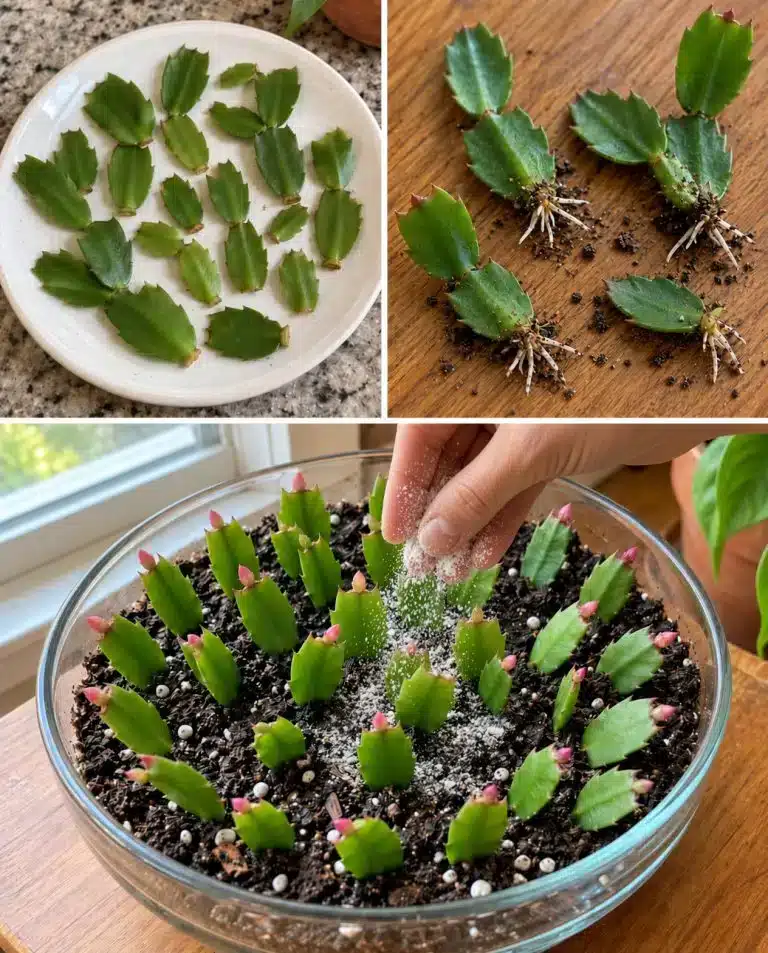
The pink tips visible on some cuttings are consistent with developing flower buds. Their presence does not prove that the cuttings have already established roots. A flowering cutting may redirect energy towards flowers instead of new roots, so propagation is usually easier with healthy, non-flowering stem sections.
Why You’ll Love Propagating Thanksgiving Cactus
- Multiply a favourite plant: Create several young plants from an established Thanksgiving cactus without purchasing additional mature specimens.
- Use simple equipment: A small pot, suitable compost, clean hands and healthy cuttings are enough to begin.
- Develop practical gardening skills: Learn how moisture, oxygen and temperature influence root development.
- Create thoughtful gifts: Established young plants make attractive presents for friends and family.
- Refresh an ageing plant: Propagation provides a way to preserve healthy growth from a mature specimen.
- Experiment with arrangements: Several rooted cuttings can eventually be grouped together for a fuller display.
- Enjoy seasonal flowering: With appropriate maturity and seasonal care, established plants can produce striking flowers.
- Build a collection economically: Propagation allows gardeners to explore different planters and growing positions using plants they already own.
Materials and Supplies for Thanksgiving Cactus Propagation
Plant Material
- 6–12 healthy Thanksgiving cactus cuttings, preferably with two or three connected segments each.
- One established, healthy parent plant.
Suggested Potting Mix
- 2 parts by volume quality indoor potting mix suitable for houseplants.
- 1 part by volume horticultural perlite or fine orchid bark, adjusted for the drainage characteristics of the base mix.
- A small amount of clean water to moisten the mix lightly.
This is a suggested starting mixture rather than a universal requirement. Some commercial epiphytic cactus mixes already provide adequate aeration and need no additional amendment.
Containers and Drainage
- Several small nursery pots with drainage holes, or one appropriately sized shallow propagation pot with drainage.
- A saucer or waterproof tray to protect furniture.
- Optional decorative outer planter for displaying established plants.
Optional Rooting and Feeding Products
- A commercially labelled rooting hormone powder suitable for ornamental stem cuttings, if desired.
- A balanced liquid houseplant fertiliser or fertiliser labelled for flowering cacti, reserved for established plants.
About the white powder: The material scattered across the growing medium in the source image is not identified. A white powdered rooting hormone is a plausible-looking gardening product, but it is not necessarily what was used. For this guide, rooting hormone is an optional product applied to the prepared cutting base only when its label permits. It is not recommended as a blanket soil sprinkle.
No quantity or concentration for a proprietary product should be assumed without its label.
Understanding the Best Propagation Materials
Healthy Thanksgiving Cactus Segments
The quality of the cutting is more important than its size. Select firm, green segments without soft areas, extensive yellowing, dark lesions or obvious pest damage.
Thanksgiving cactus stems consist of flattened connected sections called cladodes. These structures carry out photosynthesis and store some water, helping a detached cutting survive while roots develop.
A cutting with two or three connected segments is usually convenient to handle and provides enough stem tissue to support initial establishment.
Indoor Potting Mix
Good-quality indoor potting mix provides a foundation for root growth. It should retain modest moisture without becoming heavy and waterlogged.
A very fine, compacted medium may remain saturated around the cutting base, reducing oxygen and increasing the risk of decay.
Perlite
Horticultural perlite is a lightweight mineral material that helps create air spaces within potting mixes. It is especially useful when a commercial mix holds more moisture than desired.
The small white particles visible throughout many potting mixes are often perlite. These particles are different from fine white powders used as fertilisers or rooting products.
Fine Orchid Bark
Fine orchid bark can provide a coarser alternative to perlite. It creates structure and air spaces, making it useful for tropical epiphytic cacti.
Choose a particle size appropriate for small roots and cuttings. Large bark chunks alone may not provide enough stable contact for tiny newly developing roots.
Rooting Hormone Powder
Some commercial rooting products contain auxin-based active ingredients that can support root initiation in certain cuttings. Their effectiveness varies by plant and formulation.
Thanksgiving cactus usually roots readily without rooting hormone. Consequently, a rooting product is optional rather than essential.
Where the product label permits use on this type of cutting, apply only as directed. Excess powder, particularly concentrated around wet stems, is not a substitute for correct propagation conditions.
Liquid Houseplant Fertiliser
Fertilisers supply nutrients for growth after roots become established. They do not replace the moisture, oxygen and suitable temperatures required for root formation.
For young established plants, a balanced liquid houseplant fertiliser can be convenient because it allows measured feeding during active growth.
Choose a product clearly labelled for ornamental houseplants or flowering cacti and follow its instructions for dilution and frequency.
Equipment You’ll Need
- Clean secateurs or scissors: Useful if stem sections cannot be detached neatly by hand.
- Small planting pots: Support manageable moisture levels and provide drainage.
- Small scoop or spoon: Helps distribute potting mix without crushing delicate cuttings.
- Watering bottle: Allows gentle watering without dislodging stems.
- Plant labels: Useful for recording propagation dates and comparing different batches.
- Clean tray: Keeps the workspace organised and collects loose compost.
- Optional grow light: Provides supplemental light when natural indoor light is insufficient.
How to Propagate Thanksgiving Cactus Step by Step
Step 1: Select a Healthy Parent Plant
Begin with a healthy Thanksgiving cactus showing firm stems and reasonably consistent green colouring.
Inspect the plant for mealybugs, scale insects and other pests. Avoid using material from plants with unexplained spreading lesions or signs of active rot.
Whenever possible, choose cuttings after the main flowering period rather than removing large numbers of segments from a plant currently developing buds.
Step 2: Choose Suitable Stem Sections
Look for stems containing two or three connected segments. Select mature, firm growth rather than extremely soft new tips.
A cutting does not need to be particularly long. Shorter sections are often easier to position securely in a small pot.
If a stem already carries a flower bud, consider selecting another section. Bud-free cuttings are generally preferable because they can direct resources towards establishment.
Step 3: Detach the Cuttings Carefully
Hold the parent stem gently and twist a selected section at a natural joint between segments. The cutting should separate without tearing a large area of tissue.
Alternatively, use a clean cutting tool where appropriate.
Do not crush the lower segment or leave extensively damaged tissue attached.
Step 4: Allow the Cut Ends to Dry Briefly
Place freshly detached cuttings on a clean, dry surface in a shaded, well-ventilated location.
Allow the broken ends to dry and form a thin protective surface, commonly for approximately 12–24 hours. A cleanly detached joint may need less time than a damaged cut surface.
Avoid leaving cuttings in intense sunlight or extreme heat during this stage.
Step 5: Prepare the Potting Mix
Combine two parts indoor potting mix with one part perlite or fine orchid bark by volume, unless the base mix is already sufficiently airy.
Moisten the mixture lightly so it feels barely damp rather than wet.
Fill small pots with the mixture, leaving a little space below the rim for watering.
Do not compress the compost heavily. Loose structure helps oxygen reach developing roots.
Step 6: Consider an Optional Rooting Product
Thanksgiving cactus cuttings normally do not require rooting hormone, so this step can be skipped.
If using a commercially labelled rooting hormone suitable for the plant and cutting type, follow the product’s directions for preparing the cutting base and applying the powder.
Do not scatter an unidentified powder across the potting mix or onto developing flower buds.
Step 7: Plant the Stem Cuttings
Insert the lower end of each cutting into the potting mix, burying only enough of the bottom segment to keep the cutting stable.
Typically, approximately 1–2 cm (0.4–0.8 inches) of insertion is sufficient for many small cuttings, depending on their size and the mix.
Keep the upper segments above the compost surface.
Space the cuttings so air can circulate and each stem can be inspected without disturbing neighbouring plants.
Step 8: Choose the Right Location
Place the containers in bright indirect light, such as near an east-facing window or slightly away from a brighter window.
Avoid harsh midday sun while the cuttings lack established roots.
Maintain comfortable, relatively stable indoor temperatures. Conditions around 18–24°C (64–75°F) are a useful target.
Step 9: Manage Moisture Carefully
Keep the growing medium lightly moist during rooting, allowing the upper surface to begin drying between gentle waterings.
Do not repeatedly soak the container or leave water standing in the saucer.
Rootless cuttings use water slowly. Excessively wet compost is therefore more dangerous than it may be for a vigorous established plant.
Step 10: Monitor Root Development
After approximately two or three weeks, look for signs of establishment.
These may include firmer attachment to the compost, a cutting that remains upright and eventually the appearance of fresh growth.
Visible new growth is encouraging, but it does not always mean a large root system has formed.
Avoid repeatedly pulling the cuttings out of the soil to inspect them. This can damage delicate new roots.
Step 11: Move Established Cuttings Into Individual Pots
Once a cutting has developed a useful root system and begins growing, it can be transferred to a slightly larger container if necessary.
Handle the roots gently and keep the surrounding compost intact where possible.
Choose a pot only modestly larger than the root system. Oversized pots can retain excessive moisture around small plants.
Step 12: Begin Routine Care
Continue providing bright indirect light and moderate moisture.
Wait until the plant is clearly established and actively growing before considering fertiliser.
As the plant develops additional stem segments, it can gradually be managed like a mature Thanksgiving cactus.
How Thanksgiving Cactus Roots Develop
Thanksgiving cactus cuttings can produce adventitious roots from stem tissue near the base of a segment. These roots help the cutting absorb moisture and nutrients independently of the original plant.
The First Week
The cutting adapts to separation from the parent plant. The cut surface dries, and internal processes associated with root initiation may begin.
There may be no obvious visible change during this period.
Weeks Two to Four
Under favourable conditions, small roots may begin developing. Rooting can be faster or slower depending on temperature, stem maturity, moisture and the condition of the cutting.
Some cuttings remain visually unchanged while roots form below the surface.
Weeks Four to Six
Many healthy cuttings may have established a small root system by this stage. However, slower cuttings can require additional time.
New stem growth may eventually appear at the tips or joints.
After Root Establishment
Once roots can support the cutting, the plant gradually produces additional stem segments.
Over time, several rooted cuttings planted together can form a fuller houseplant.
What Healthy Roots Look Like
Healthy young roots are commonly pale cream to white, although colour can vary with age and growing medium.
They should feel reasonably firm rather than soft and slimy.
Brown roots are not automatically rotten. Evaluate texture, smell and overall plant condition before deciding that root damage has occurred.
Best Potting Mix for Thanksgiving Cactus Cuttings
Choosing the best potting mix for Thanksgiving cactus propagation means balancing three essential requirements: moisture retention, drainage and air circulation.
Commercial Indoor Houseplant Mix
A quality indoor potting mix can work well when it has a light, open structure.
It is convenient for beginners and usually contains ingredients designed to support container-grown plants.
If the mix feels very dense or remains wet for long periods, additional aeration may be beneficial.
Epiphytic Cactus Potting Mix
A mix specifically designed for tropical or epiphytic cacti is often a practical choice.
These products commonly combine moisture-retentive organic ingredients with coarser particles that help air reach the roots.
Read the ingredient description rather than relying only on the word cactus on the packaging.
Desert Cactus and Succulent Mix
Some commercial cactus mixes drain rapidly and may be suitable when combined with appropriate organic material.
However, an extremely sandy, mineral-heavy mixture intended for desert succulents may dry too quickly for young Thanksgiving cactus roots.
Thanksgiving cactus is not managed exactly like a desert cactus.
Perlite Versus Orchid Bark
Perlite: Lightweight, widely available and useful for improving aeration. It does not provide meaningful fertiliser nutrition.
Fine orchid bark: Adds larger air spaces and organic structure. Its suitability depends on particle size and how the overall mixture retains moisture.
Combination approach: A blend containing both can be effective when the final texture remains stable and evenly moist without waterlogging.
Why Drainage Holes Matter
A clear glass propagation dish can look attractive, but a container without drainage holes requires particularly careful moisture management.
For routine propagation, a nursery pot with drainage holes is the more forgiving option.
If you enjoy the appearance of glass, place a smaller draining pot inside a decorative glass container and remove accumulated water after watering.
White Rooting Powder and Thanksgiving Cactus Fertiliser
White powders used in gardening can belong to several different product categories. For Thanksgiving cactus propagation, the most relevant comparison is between rooting hormone, fertiliser and soil amendments.
White Powdered Rooting Hormone
A commercially labelled rooting hormone powder is one option for gardeners who want to experiment with assisted root initiation.
Such products are typically intended for application to the prepared base of cuttings rather than general distribution across the compost.
Not every rooting hormone is suitable for every plant or cutting type. Check the active ingredient, label instructions and intended application.
Because Thanksgiving cactus often roots easily without hormone, it is sensible to compare treated and untreated cuttings rather than assume a powder is necessary.
Water-Soluble Houseplant Fertiliser
Once cuttings have developed roots and started growing, a balanced water-soluble houseplant fertiliser can supply nutrients needed for ongoing development.
Products containing nitrogen, phosphorus and potassium support different aspects of normal plant growth, but no single nutrient guarantees abundant flowering or rapid rooting.
Use the dilution specified on the product label for the plant and growth stage. Avoid feeding dry, stressed or newly inserted unrooted cuttings.
Slow-Release Fertiliser Granules
Slow-release products can be convenient for established container plants because nutrients become available gradually.
However, they may be less suitable for tiny propagation containers where precise feeding control is important.
Choose a product specifically suitable for container-grown ornamental plants and follow its label.
When Should You Start Feeding?
Do not fertilise immediately simply because a cutting has been placed in compost.
Wait until roots have established and the plant shows active growth. If the potting mix already contains fertiliser, additional feeding may not be necessary for some time.
Overfeeding can increase dissolved salt concentrations around tender roots, potentially causing damage.
Can White Powder Be Sprinkled Over the Soil?
Only when the particular product is labelled for that method and the application is suitable for the plant.
Rooting hormone, fertiliser and mineral amendments have different purposes. Their application methods are not interchangeable.
For this propagation project, healthy cuttings, suitable compost, correct drainage and careful moisture management should remain the foundation of success.
Expert Tips for Stronger Thanksgiving Cactus Cuttings
- Propagate after flowering: Spring growth provides a useful opportunity to take cuttings without interrupting the main seasonal flower display.
- Choose firm segments: Healthy mature stem sections are generally more dependable than very soft or visibly stressed growth.
- Use natural stem joints: Detaching at a joint helps minimise unnecessary damage.
- Keep the cutting base shallow: Excessively deep planting can expose too much stem tissue to damp compost.
- Choose smaller pots: Containers proportionate to the cuttings make moisture easier to control.
- Provide bright filtered light: Enough light supports photosynthesis without excessive moisture loss from strong direct sunshine.
- Avoid cold windowsills: Cold glass and draughts can slow establishment even when the room feels comfortable.
- Inspect the compost before watering: Surface appearance alone may not reveal how wet the deeper mix remains.
- Label propagation batches: Dates help you compare rooting times and growing conditions.
- Do not disturb emerging roots: Repeatedly lifting cuttings can interrupt establishment.
- Separate feeding from rooting: Nutrient supply becomes more important after roots can absorb it effectively.
- Remove failing material promptly: A cutting that becomes soft and rotten should be separated from healthy cuttings.
- Introduce brighter light gradually: Young plants benefit from gradual adjustment rather than abrupt exposure.
- Be patient with flowering: A well-established plant needs suitable seasonal conditions and maturity before reliable flowering can be expected.
Common Thanksgiving Cactus Propagation Mistakes
1. Planting in Heavy, Waterlogged Soil
Problem: The lower cutting becomes soft or discoloured.
Possible cause: Excess moisture and inadequate oxygen around the stem.
Solution: Use a lighter potting mix, improve drainage and reduce watering frequency according to actual moisture conditions.
2. Using Containers Without Drainage
Problem: Water accumulates beneath the compost.
Possible cause: The container has no drainage outlet.
Solution: Move cuttings into an appropriately sized pot with drainage holes.
3. Burying Too Much of the Stem
Problem: Lower segments become soft or deteriorate.
Possible cause: Excessive stem contact with persistently damp compost.
Solution: Insert only enough of the bottom segment to stabilise the cutting.
4. Placing Cuttings in Strong Sunlight
Problem: Segments become pale, reddish or shrivelled.
Possible cause: Excessive direct light or heat, especially before roots have developed.
Solution: Provide bright indirect light and inspect temperature and moisture conditions.
5. Applying Fertiliser Too Early
Problem: Young plants fail to improve despite repeated feeding.
Possible cause: Immature roots, excess fertiliser salts or an unrelated growing problem.
Solution: Stop unnecessary feeding, check drainage and allow the roots to establish.
6. Using Unidentified White Powder
Problem: Gardeners cannot determine whether the material is appropriate or how much to use.
Solution: Select a clearly labelled horticultural product only when it serves a genuine purpose, and follow its specified application method.
7. Removing Cuttings Repeatedly
Problem: Newly formed roots break during inspection.
Solution: Leave cuttings undisturbed and observe their condition above the compost.
8. Taking Too Many Cuttings From a Weak Plant
Problem: The parent plant loses substantial healthy growth.
Solution: Take a modest number of cuttings from vigorous plants and allow the parent to recover.
9. Expecting Immediate Flowers
Problem: A young plant produces healthy growth but no flowers.
Possible cause: Immaturity or unsuitable seasonal flowering conditions.
Solution: Focus on establishment and provide appropriate seasonal care once the plant matures.
10. Confusing Dehydration With Root Rot
Problem: Stem segments appear wrinkled or limp.
Possible causes: Insufficient moisture, damaged roots, excessive heat or prolonged waterlogging.
Solution: Check compost moisture, drainage and root condition before changing the watering routine.
Optional Thanksgiving Cactus Propagation Variations
Individual Nursery Pots
Plant one or two cuttings in each small pot. This makes it easier to monitor individual plants and isolate any that develop problems.
Community Propagation Pot
Plant several cuttings in one draining container to create a fuller arrangement as they grow. Leave enough space for inspection and airflow.
Water Propagation
Thanksgiving cactus cuttings can sometimes develop roots in water. Keep only the lower portion in clean water and avoid submerging large areas of stem.
Transfer rooted cuttings carefully into suitable potting mix. Water-grown roots may need time to adapt to the new medium.
Perlite-Rich Propagation Mix
Use a slightly more aerated mix when ordinary compost remains too wet in your environment. Monitor moisture carefully because highly aerated mixes may dry more quickly.
Fine Bark-Based Mix
Try an epiphytic cactus blend containing fine orchid bark. This can be particularly useful in warm, humid indoor growing conditions.
Bright Shelf With Supplemental Lighting
Where natural light is limited, a suitable full-spectrum LED grow light can support healthy growth.
Follow the manufacturer’s distance and duration recommendations and observe the plant for signs of excess or insufficient light.
Mixed Cutting Display
Combine several established cuttings from the same healthy plant into one attractive container after rooting. Ensure the final pot has adequate drainage and room for growth.
Beautiful Ways to Display Thanksgiving Cactus
Minimalist Ceramic Planters
A simple white or cream ceramic planter complements the glossy green segmented stems and colourful seasonal flowers.
Use a removable nursery pot inside the decorative container to maintain reliable drainage.
Natural Terracotta
Terracotta adds a warm, traditional appearance and can allow moisture to evaporate through the pot walls.
Because it may dry more quickly than glazed ceramic or plastic, monitor the compost rather than applying the same watering frequency to every pot type.
Modern Glass Displays
Transparent glass can create an attractive botanical presentation, particularly when paired with natural wood and bright window light.
For long-term cultivation, keep the plant in a draining inner pot rather than relying on a sealed glass bowl filled directly with compost.
Floating Plant Shelves
Established Thanksgiving cactus plants develop arching, segmented stems that look attractive on elevated shelves.
Position shelves where the plant receives adequate light and can be watered without damaging nearby furniture.
Seasonal Holiday Arrangements
Thanksgiving cactus flowers can complement autumn and winter interiors.
Pair a flowering plant with neutral ceramics, warm wooden surfaces and restrained seasonal decorations without obstructing the stems or reducing airflow.
Luxury Indoor Plant Corners
A mature Thanksgiving cactus can become an elegant feature when displayed on a slim metal plant stand beside other compatible tropical houseplants.
Choose neighbouring plants with similar light requirements, but keep each species in its own appropriate growing medium and container.
Ongoing Thanksgiving Cactus Care
Watering Established Plants
Once roots are well established, water thoroughly when the upper portion of the potting mix has begun to dry.
Allow excess water to drain away. Avoid leaving the pot standing in water.
Watering frequency changes with temperature, light, humidity, pot size and growing medium.
Light Requirements
Provide bright indirect light for healthy growth. Gentle morning sunshine may be tolerated, while intense afternoon sun can damage stems.
Rotate the pot occasionally during vegetative growth if the plant leans strongly towards a window.
Feeding During Active Growth
Established Thanksgiving cactus plants may benefit from a suitable houseplant fertiliser during active growth.
Follow the fertiliser label and avoid excessive application. Reduce or pause feeding when growth slows or the plant is stressed.
Encouraging Seasonal Flowering
Thanksgiving cactus flowering is influenced by seasonal changes in day length and temperature.
Cooler nights and uninterrupted periods of darkness can help initiate flower buds on mature plants.
For many indoor plants, temperatures around 13–18°C (55–64°F) during suitable autumn conditions can support bud development, provided the plant is protected from damaging cold.
Once buds form, avoid abrupt changes in temperature, light and watering that could contribute to bud drop.
Pruning and Shaping
After flowering, remove selected stem sections at their joints to encourage a more balanced shape.
Healthy removed segments can be used for propagation.
Repotting
Repot when roots have filled the container or the growing medium has deteriorated.
Thanksgiving cactus generally does not require a dramatically larger pot. Move up only one modest pot size when necessary.
Pest Monitoring
Inspect stem joints and undersides regularly for mealybugs, scale insects and spider mites.
If pests are found, identify them before choosing a control product. Use treatments specifically labelled for the plant and pest, and follow all directions.
Winter Care
Protect the plant from frost, cold draughts and direct contact with freezing windows.
Adjust watering to slower growth and cooler conditions without allowing the root system to remain saturated.
Care During Holidays
Before leaving home, check the growing medium and position the plant away from excessive heat or direct sunlight.
Do not leave the pot submerged in water as a substitute for appropriate care.
Safe Product Storage
Store fertilisers, rooting hormones and pest-control products in their original labelled packaging, away from children, pets and food preparation areas.
Frequently Asked Questions About Thanksgiving Cactus Propagation
1. Can you grow Thanksgiving cactus from a single segment?
Yes. A single healthy segment can sometimes root successfully, although a cutting containing two or three connected segments is often easier to handle.
2. How long does Thanksgiving cactus take to root?
Many cuttings begin developing roots within approximately two to six weeks under favourable conditions. Some require longer.
3. Should Thanksgiving cactus cuttings dry before planting?
Allowing the detached end to dry briefly can help protect damaged tissue. A period of approximately 12–24 hours is often suitable, depending on the cut surface and conditions.
4. What is the best soil for Thanksgiving cactus cuttings?
A light, airy indoor potting mix containing suitable aeration materials such as perlite or fine orchid bark is a good starting choice.
5. Do Thanksgiving cactus cuttings need rooting hormone?
No. Healthy Thanksgiving cactus cuttings frequently develop roots without hormone products.
6. Can I use white rooting powder on Thanksgiving cactus?
A labelled rooting hormone powder may be suitable when its instructions include the relevant cutting type. Use it only as directed and do not assume that every white powder is rooting hormone.
7. Should I sprinkle rooting powder over the soil?
Rooting hormone powders are generally intended for specific application to cutting bases, not for routine scattering over potting compost. Follow the exact product label.
8. Can fertiliser make Thanksgiving cactus root faster?
Fertiliser is not a substitute for root initiation. Appropriate light, moisture, aeration and temperature are more important during early propagation.
9. When should I fertilise newly rooted cuttings?
Wait until the roots are established and active growth is visible. Check whether the potting mix already contains nutrients before adding fertiliser.
10. Why are my Thanksgiving cactus cuttings turning yellow?
Yellowing can result from several causes, including excessive moisture, strong light, temperature stress or root problems. Inspect the overall growing conditions before choosing a treatment.
11. Why are the cuttings becoming soft?
Soft, deteriorating stem tissue may indicate decay, particularly when compost remains persistently wet. Remove affected material and review drainage and moisture conditions.
12. Can Thanksgiving cactus root in water?
Yes, some cuttings can root in water. Soil propagation is often convenient because it avoids an additional transition from water to potting mix.
13. Should I remove pink buds from cuttings?
For propagation, non-flowering cuttings are generally preferable. Removing a developing bud may help a cutting direct resources towards establishment, although a budded cutting is not automatically incapable of rooting.
14. Why does my cutting have roots but no new growth?
Root establishment may occur before visible stem growth. Continue providing appropriate care and allow additional time.
15. How often should I water Thanksgiving cactus cuttings?
Water according to the moisture level of the growing medium rather than a fixed daily schedule. Keep it lightly moist without waterlogging.
16. Can I propagate Thanksgiving cactus in winter?
It is possible indoors when light and temperature are suitable, but spring and early summer are generally more convenient because growth is more active.
17. Do Thanksgiving cactus cuttings need direct sunlight?
No. Bright indirect light is usually preferable, especially before the cuttings have developed roots.
18. What size pot should I use?
Choose a small pot proportionate to the cutting and its developing roots. Drainage holes are more important than decorative appearance.
19. Can I plant several cuttings together?
Yes. Several rooted cuttings can eventually create a fuller plant. Allow enough space for airflow and future growth.
20. Why are my Thanksgiving cactus buds falling off?
Bud drop can be associated with abrupt environmental changes, moisture problems, temperature fluctuations or other stress. Maintain stable conditions and investigate the plant’s overall care.
21. Are Thanksgiving cactus and Christmas cactus the same?
They are closely related but are not necessarily the same plant. Thanksgiving cactus, Schlumbergera truncata, typically has more pointed stem margins, while many Christmas cactus forms have rounder or scalloped margins.
22. Can Thanksgiving cactus grow in a glass bowl?
It can be displayed in glass, but a sealed bowl without drainage is less forgiving. A draining inner pot is preferable for routine growing.
23. Does Thanksgiving cactus need high humidity?
It appreciates moderate humidity, but ordinary indoor conditions are often adequate. Avoid persistently wet compost in an attempt to compensate for dry air.
24. When will a propagated Thanksgiving cactus flower?
Flowering depends on maturity, seasonal light exposure, temperature and general plant health. Young plants may need additional growing seasons before flowering reliably.
25. How can I make my Thanksgiving cactus fuller?
Provide suitable light, maintain healthy growth and consider pruning established stems after flowering. Several rooted cuttings can also be planted together to create a fuller arrangement.
Complete Thanksgiving Cactus Propagation Care Card
Project: Thanksgiving Cactus Propagation From Stem Cuttings
Plant: Schlumbergera truncata
Category: Indoor plant propagation
Method: Rooting stem segments in potting mix
Preparation time: 10–15 minutes
Hands-on planting time: 15–25 minutes
Estimated initial rooting: 2–6 weeks or longer
Suggested batch: 6–12 cuttings
Light: Bright indirect light
Temperature: Approximately 18–24°C (64–75°F)
Recommended Supplies
- 6–12 healthy stem cuttings with two or three connected segments each
- 2 parts indoor potting mix by volume
- 1 part horticultural perlite or fine orchid bark by volume
- Clean water for lightly moistening the mixture
- Small pots with drainage holes
- Clean scissors or secateurs if required
- Plant labels, optional
- Labelled rooting hormone powder, optional and only if suitable for the cuttings
- Suitable liquid houseplant fertiliser for later established growth, optional
Quick Propagation Instructions
- Choose a healthy Thanksgiving cactus parent plant.
- Select six to twelve firm, healthy cuttings with two or three connected segments each.
- Detach the cuttings carefully at their natural joints.
- Allow damaged ends to dry briefly in a shaded, ventilated location.
- Prepare an airy potting mix using two parts indoor mix and one part perlite or fine bark by volume, adjusting if the base mix is already airy.
- Lightly moisten the compost.
- If desired, apply a suitable labelled rooting hormone to the cutting bases according to its instructions.
- Insert the lower portion of each cutting shallowly into the potting mix.
- Place the containers in bright indirect light at comfortable indoor temperatures.
- Maintain light moisture without allowing the compost to remain saturated.
- Monitor for establishment over the following weeks without repeatedly disturbing the roots.
- Once rooted and actively growing, move plants into appropriate containers if necessary.
- Begin routine watering and consider suitable fertiliser only after establishment.
Aftercare Notes
Protect the cuttings from harsh sunlight, frost and persistently wet compost. Watch for soft stems, spreading discolouration and other signs of deterioration.
New roots may form before visible stem growth. Allow time for establishment rather than adding unnecessary fertiliser or other treatments.
Helpful Hashtags
#ThanksgivingCactus #CactusPropagation #HouseplantPropagation #Schlumbergera #PlantCuttings #IndoorGardening #HouseplantCare #PlantParent #GardeningTips #RootedCuttings
Share Your Thanksgiving Cactus Growing Experience
Have you tried growing Thanksgiving cactus from stem cuttings? Whether you prefer soil propagation, individual nursery pots or a fuller container with several cuttings, every growing experience can teach you something useful.
Share how long your cuttings took to root, which potting mix worked best and whether your young plants eventually developed beautiful seasonal flowers.
Save this Thanksgiving cactus propagation guide for your next gardening project, and follow along for more practical advice on houseplants, flowering cacti and indoor plant care.