Thanksgiving Cactus: Buds and Brown Powder
A complete guide to feeding, pink flower buds, purple-tinged segments, organic soil amendments and healthy seasonal flowering.
Introduction: Caring for a Thanksgiving Cactus in Bud
A Thanksgiving cactus covered in pink flower buds is one of the most beautiful sights in an indoor garden. Its unusual green stem segments, sharply pointed edges and rich seasonal colours create an attractive display just as many other houseplants begin slowing their growth for autumn and winter. When the segments take on reddish-purple tones, the combination becomes even more striking.
Keeping those beautiful buds attached, however, requires more than simply adding fertiliser. Successful Thanksgiving cactus care depends on consistent moisture, excellent drainage, bright indirect light and relatively stable temperatures. A plant preparing to flower is particularly sensitive to abrupt changes in its environment, so the right care at the right stage matters much more than an extra feeding.
Brown organic fertilisers and soil amendments are popular among indoor gardeners because they can improve container growing media and contribute nutrients over time. One practical option is commercially prepared worm castings, sometimes sold as vermicompost. These can be suitable for houseplants when used conservatively and in accordance with product directions. They are best considered during active growth rather than as an emergency treatment for a cactus already carrying delicate flower buds.
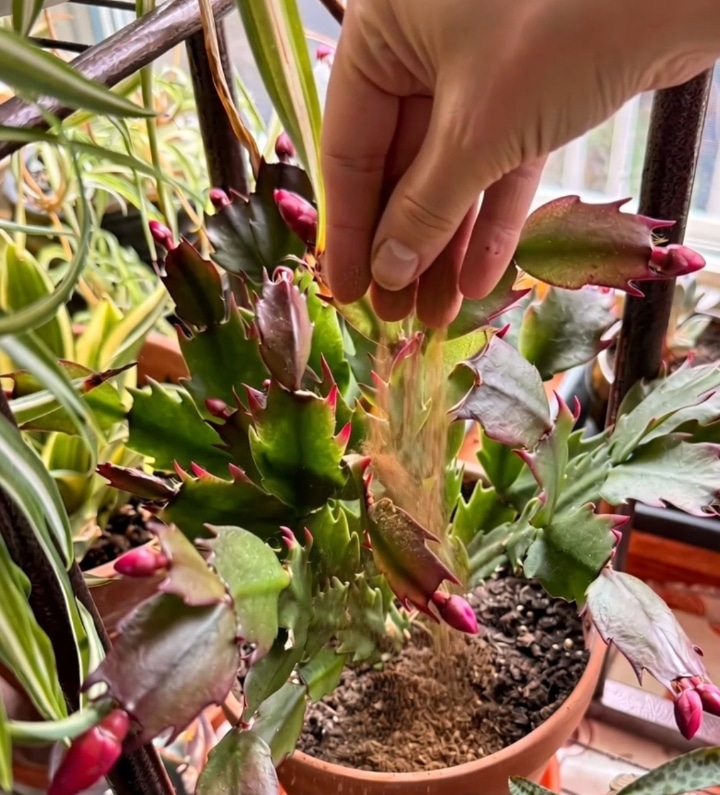
In the accompanying image, brown powdery material is being sprinkled around a Thanksgiving cactus with developing pink buds and purple-tinged segments. The material’s identity is not established by its appearance. This guide therefore uses labelled worm castings as a separate, optional organic feeding example rather than identifying the photographed powder or assuming it caused the buds.
Another important detail is the reddish-purple colouring visible on several segments. Thanksgiving cacti do not have ordinary leaves like most foliage plants; their flattened green structures are modified stems. These segments can develop red, bronze or purple pigmentation in response to strong light and environmental conditions. Sometimes the change is harmless, while other times it indicates that growing conditions need adjustment.
Whether you are caring for an inherited holiday cactus, choosing the best indoor plant fertiliser, comparing premium potting mixes or trying to prevent flower bud drop, this guide explains how to protect your plant’s roots, encourage steady growth and enjoy its seasonal display without unnecessary treatments.
1. Thanksgiving Cactus Overview
Common name: Thanksgiving cactus, crab cactus, claw cactus or holiday cactus.
Botanical name: Schlumbergera truncata.
Plant family: Cactaceae.
Plant type: Tropical, epiphytic cactus grown primarily as a flowering houseplant.
Native habitat: Moist forest environments of southeastern Brazil, where these cacti grow on trees and rocky surfaces with access to moisture and air around their roots.
Identification: The pointed, tooth-like projections along the flattened stem segments are characteristic of Thanksgiving cactus. Christmas cactus hybrids often have smoother, more rounded segment margins. Cultivated plants may be hybrids, so an exact cultivar identification requires additional information.
Plant condition: An established plant with multiple branching stems, developing pink buds and some reddish-purple pigmentation. The visible material on the potting mix cannot establish the plant’s nutritional status.
Growing location: Indoors in bright, indirect light. Shaded outdoor growing is possible in suitable frost-free conditions.
Preferred growing temperature: Approximately 60–70°F (16–21°C) is a useful indoor range during the flowering period. Active-growing plants also tolerate somewhat warmer conditions.
Flower initiation: Cooler autumn nights, commonly around 55–65°F (13–18°C), together with long, uninterrupted dark periods, encourage many Thanksgiving cactus varieties to form buds.
Light: Bright, filtered daylight with protection from harsh direct sunshine.
Potting medium: A moisture-retentive but freely draining indoor potting mix containing sufficient air spaces.
Container: A drainage pot made from terracotta, plastic or another suitable material. Decorative outer pots are acceptable if excess water is removed.
Recommended feeding approach: Modest applications of a balanced houseplant fertiliser during active growth. Commercial worm castings are an optional organic amendment, not a substitute for correcting poor growing conditions.
Best feeding season: Primarily spring and summer during active growth. Reduce or pause feeding as the plant enters its autumn flowering cycle.
Preparation time: Approximately 5–10 minutes to inspect the plant and check moisture.
Hands-on maintenance: Usually 5–15 minutes, depending on the task. Repotting requires additional time and should normally wait until after flowering.
Response period: Improvements in watering and placement may help stabilise the plant over subsequent days and weeks. New segments generally develop during active growing periods, while bud opening depends on bud maturity and conditions.
Plant quantity: One established Thanksgiving cactus in one container, with the principles adaptable to several plants.
Pet and child considerations: Keep fertilisers, pest-control products and gardening tools safely stored. Avoid allowing pets or children to handle unidentified treatments.
Why Thanksgiving Cactus Is Different from Desert Cactus
Despite its common name, Thanksgiving cactus does not naturally grow in dry desert sand. It is adapted to tropical environments where rainfall, decomposing organic matter and air circulation create very different root conditions.
Its roots need oxygen, which means the potting mix cannot stay waterlogged. Yet allowing the entire root system to become excessively dry during flowering can also damage buds.
This combination explains why a good holiday cactus potting mix must balance drainage and moisture retention instead of prioritising dryness alone.
The plant’s flat segments are also important. They carry out photosynthesis, support new branches and produce flower buds at their tips. Keeping these segments healthy is a central part of long-term Thanksgiving cactus care.
2. Why You’ll Love Growing Thanksgiving Cactus
Beautiful Seasonal Pink Flowers
Thanksgiving cactus produces distinctive tubular flowers that can brighten a home during autumn and winter. Pink varieties look especially attractive against rich green and burgundy-toned segments.
Long-Lived Houseplant Potential
With appropriate care, holiday cacti can survive for many years. Mature plants often become larger, more branched and increasingly impressive over time.
Excellent for Indoor Plant Collections
The plant complements spider plants, pothos, tropical foliage plants and decorative indoor planters. Its branching structure provides visual contrast with upright houseplants.
Suitable for Compact Living Spaces
A small Thanksgiving cactus can grow comfortably on a bright shelf or windowsill, provided it receives sufficient light and has room for its branches.
Interesting Natural Colour Variation
Green segments sometimes develop reddish or purple pigments, creating an attractive effect. Understanding the reason for a colour change helps gardeners decide whether it is simply seasonal pigmentation or a sign of stress.
Easy to Propagate After Flowering
Healthy stem sections can be rooted to produce new plants. This makes Thanksgiving cactus suitable for sharing with family and friends.
Compatible with Different Decorative Pots
Terracotta, ceramic and hanging planters can all work well when moisture and drainage are managed correctly.
A Rewarding Seasonal Care Routine
Watching buds develop naturally encourages closer attention to light, temperature and watering. These observations can also improve the care of other tropical houseplants.
3. Materials and Supplies
The original gardening scene involves one mature potted holiday cactus, an existing growing medium and an unidentified brown material. The following recommended supplies create a practical care routine without assuming the photographed powder is an approved fertiliser.
Essential Plant and Container Supplies
- One established Thanksgiving cactus with healthy, firm stem segments.
- One appropriately sized plant pot with functional drainage holes.
- Clean water suitable for normal indoor plant care.
- An existing, freely draining potting mix that does not remain saturated for prolonged periods.
- A saucer or removable decorative outer container for collecting drainage.
- A bright indoor location protected from excessive direct sunshine and sudden temperature changes.
Optional Organic Fertiliser
- Commercially prepared, fully processed worm castings labelled for container plants or houseplants.
- Quantity: a light top-dressing only, following the directions for the selected product and container size.
- Application season: active growth, preferably after the flowering cycle.
- Purpose: a modest organic nutrient contribution and improvement of the growing medium.
Alternative Conventional Fertiliser
- A balanced, water-soluble houseplant fertiliser suitable for flowering indoor plants.
- Clean water for dilution according to the manufacturer’s label.
- A measuring cap or other appropriate device for accurate product measurement.
Choose one fertiliser programme rather than applying several different products together without a clear reason.
Optional Repotting Materials
- Fresh, high-quality indoor potting compost or houseplant potting mix.
- Horticultural perlite for improving aeration.
- Small-grade orchid bark where additional structure is needed.
- A replacement drainage pot only if the existing container is unsuitable or the plant genuinely requires more root space.
Materials Not Included in the Recommended Method
The photographed brown powder has no confirmed product name, ingredients or application directions. It is therefore not included as an approved treatment. There is also no need to add coffee grounds, cinnamon, ash, sugar or homemade kitchen mixtures merely because they resemble an organic fertiliser.
A responsible feeding programme begins with a known product and a suitable growing stage.
4. Choosing the Best Fertiliser, Soil and Container
Worm Castings as a Brown Organic Fertiliser
Worm castings are the processed organic material produced through vermicomposting. Depending on the product and how finely it has been screened, they can appear as dark-brown crumbs, fine granules or soil-like particles.
That appearance makes them a plausible example for an article discussing brown organic plant amendments, but visual similarity is not evidence that any pictured substance is worm castings.
Properly prepared worm castings can contribute organic matter and a relatively modest supply of plant nutrients. The nutrient content is variable and generally less predictable than that of a fertiliser with a clearly stated mineral nutrient analysis.
For a Thanksgiving cactus, the key advantage of a carefully selected organic amendment is its potential to supplement a suitable growing medium rather than act as an instant flowering stimulant.
When worm castings are useful: During spring or summer when the plant is actively producing new segments, the mix drains well and there is a reason to supplement its fertility.
When to postpone them: While numerous buds are forming, immediately after repotting, when roots may be damaged, or when the potting mix already stays excessively wet.
How to choose a product: Look for commercially processed material with clear usage instructions, appropriate storage information and a declared purpose as a potting amendment or plant fertiliser. Avoid unidentified bulk powders and incompletely decomposed kitchen waste.
How to apply: Follow the selected product’s container-plant directions. Use only a light surface application, keep the material away from the plant’s crown and segment bases, and maintain a loose, aerated surface. A thick blanket of fine organic material is unnecessary in a small indoor pot.
Balanced Liquid Houseplant Fertiliser
A balanced liquid fertiliser is often the simplest feeding option for someone who wants predictable nutrient information.
Products labelled with an NPK analysis show their percentages of nitrogen, phosphorus and potassium. The exact formulation varies by brand, and no single NPK number is necessary for every Thanksgiving cactus.
Nitrogen supports healthy vegetative growth, phosphorus contributes to normal plant metabolism and root processes, and potassium has several essential physiological functions.
A balanced houseplant fertiliser applied conservatively during active growth is generally suitable for a healthy holiday cactus.
Some university horticultural guides recommend monthly feeding during the growing season, with reduced concentrations where specified. Always respect the particular product label rather than converting a recommendation for one formula into an assumed dose for another.
Do not use concentrated liquid fertiliser directly on dry roots. Prepare and apply it according to the label, and avoid unnecessary feeding while the plant is stressed.
Flowering Fertilisers and Bloom Boosters
Garden centres often sell specialised flowering plant fertilisers, sometimes described as bloom boosters or high-phosphorus fertilisers.
Although flowering nutrients are essential, increasing phosphorus is not a substitute for the seasonal night conditions that trigger Thanksgiving cactus flower buds.
A plant with adequate nutrients may develop buds naturally when its light and temperature requirements are satisfied. Adding an expensive flowering formula will not reliably overcome continuous artificial light at night or repeated bud drop caused by drought.
Some horticultural programmes use a lower-nitrogen feed during the transition towards flowering. This is an optional approach, not a requirement for every plant. Avoid combining multiple nutrient products or assuming that a higher phosphorus number always produces more flowers.
Slow-Release Fertiliser Granules
Slow-release fertiliser is another option for indoor plants. Depending on the formulation, granules can supply nutrients over an extended period.
However, release rates may depend on temperature, watering and the product’s coating technology. A small holiday cactus pot can also receive excess nutrients if the gardener adds granules without measuring them.
Choose slow-release products only when they are labelled for the plant or appropriate container growing conditions. Keep them out of the plant’s crown and avoid adding them on top of an existing feeding programme without accounting for the combined nutrient supply.
Worm Castings Versus Liquid Fertiliser
Worm castings: Suitable for gardeners who want an organic soil amendment with variable nutrient release. They may contribute to the organic component of the growing medium, but their nutrient concentration is not necessarily standardised.
Liquid fertiliser: Suitable when accurate dosing and a defined NPK analysis are priorities. The gardener must prepare the correct dilution and apply it at an appropriate interval.
Slow-release fertiliser: Convenient for reducing the number of manual feeding applications, provided the selected formula is appropriate and the directions are followed.
Best practical choice: For most established Thanksgiving cacti, a suitable potting mix and a modest seasonal feeding programme are more valuable than collecting several fertilisers.
Best Potting Mix for Thanksgiving Cactus
The best soil for Thanksgiving cactus should hold some moisture while allowing excess water to drain and fresh air to reach the roots.
Heavy garden soil is generally unsuitable for indoor pots because it may compact, drain poorly and introduce unwanted organisms.
An appropriate commercial houseplant potting mix can work well, especially when it includes ingredients such as perlite, bark or other materials that maintain air spaces.
A useful optional homemade blend is:
- Two parts good-quality indoor potting mix.
- One part horticultural perlite.
- One part small-grade orchid bark.
These proportions are measured by volume, not weight. They are a suggested starting blend rather than a universal requirement. Adjust the proportions to the water retention of the original potting mix and your indoor growing conditions.
The orchid bark provides structural air spaces. Perlite reduces compaction and improves aeration. The houseplant potting mix retains enough water to prevent the roots from drying immediately.
For a dry, heated room or a very porous terracotta pot, a slightly more moisture-retentive commercial mix may work better. For a humid environment, additional aeration may be beneficial.
Always prioritise the way the finished mixture behaves after watering rather than relying on its ingredients alone.
Should You Buy Cactus Soil or Orchid Mix?
Both products can be useful, but neither is automatically ideal on its own.
Some desert cactus mixes dry rapidly and may need more moisture-retentive material for an epiphytic holiday cactus. Some orchid bark mixes contain large pieces and may dry too unevenly when used alone.
A high-quality indoor potting mix with suitable drainage is usually an excellent starting point.
When comparing premium potting soils, check the listed ingredients, water retention, drainage behaviour and whether fertiliser has already been incorporated. Pre-fertilised potting mix affects how much additional feeding a plant requires.
Terracotta Pots Versus Plastic Planters
Terracotta is attractive because of its natural earthy colour and porous walls. It allows moisture to evaporate through the container, which can help prevent prolonged saturation in some growing conditions.
However, terracotta also dries faster than plastic. A Thanksgiving cactus covered in buds may therefore need more frequent moisture checks in a small clay pot.
Plastic pots retain moisture longer and may be convenient in dry homes, but they can make overwatering more likely if the potting mix is heavy or drainage is restricted.
Glazed ceramic planters are excellent decorative containers, particularly for living rooms and holiday displays. If the ceramic pot has no drainage hole, use it as a removable outer pot around a properly draining inner container.
The best planter is not necessarily the most expensive. It is the one that keeps the root environment manageable and provides enough room for healthy growth.
5. Equipment You’ll Need
- Small watering can: Allows controlled watering around the soil without repeatedly splashing flower buds.
- Finger or wooden moisture-checking stick: Helps assess whether the upper potting mix is beginning to dry.
- Drainage saucer: Collects excess water after irrigation and should be emptied promptly.
- Small measuring scoop: Useful when applying a labelled fertiliser or organic amendment in the appropriate quantity.
- Clean trowel: Optional, for repotting or carefully loosening a compacted surface after the flowering season.
- Clean secateurs: Useful for removing genuinely damaged segments or preparing propagation cuttings after flowering.
- Indoor thermometer: Helps identify excessive heat or unexpected cold near windows.
- Humidity monitor: Optional for homes with very dry indoor air.
- Full-spectrum indoor grow light: Optional where natural daylight is inadequate.
- Protective gloves: Use when required by the fertiliser or pest-control product label.
A moisture meter can provide additional information, but readings are not always reliable in chunky or highly organic potting media. Checking the mix directly and learning the weight of the pot are often more useful.
6. Step-by-Step Thanksgiving Cactus Care
This is a newly developed care plan for an established Thanksgiving cactus carrying pink flower buds. It separates immediate bud care from optional organic feeding later in the growing cycle.
Step 1: Examine the Green and Purple Segments
Begin by looking at the entire plant before adding water or fertiliser.
Healthy Thanksgiving cactus segments should normally feel reasonably firm and retain their distinctive flattened shape. A mature plant may include a combination of bright green new growth, darker older segments and naturally reddish areas.
Check the tips for developing buds and examine the joints where segments connect.
Look for soft, mushy tissue, spreading black patches, unusual cotton-like material, sticky residue or visible insects.
If the plant is firm and carrying healthy buds, avoid unnecessary treatment. Attractive purple pigmentation alone does not establish that the plant needs fertiliser.
Step 2: Choose a Stable Indoor Location
Place the cactus where it receives bright but filtered daylight, such as near an east-facing window or at a suitable distance from a brighter south- or west-facing window.
A sheer curtain can soften strong afternoon sun.
Because the plant is already developing buds, minimise changes to its position. Sudden shifts in light intensity, room temperature and exposure to draughts can interfere with flower development.
Avoid positioning it directly beside a heating vent, open exterior door or cold windowpane.
Step 3: Check Soil Moisture Before Watering
Insert a clean finger approximately 2–3 cm, or around 1 inch, into the upper layer of potting mix, taking care not to damage shallow roots.
If the upper layer has begun drying but the root zone is not saturated, watering may be appropriate.
If the potting medium still feels distinctly wet, allow more time and check again.
The goal while flowering is reasonably even moisture, not permanently wet soil.
In a terracotta container, moisture may disappear more quickly than in plastic, especially in a warm room.
Step 4: Water Thoroughly When Needed
When the plant needs water, apply it slowly across the surface of the potting mix.
Continue until excess water begins leaving the drainage holes. This encourages more even moisture distribution throughout the root zone.
Allow the pot to finish draining and empty the saucer.
Do not leave the container standing in water, as that can reduce oxygen around the roots and increase the likelihood of root problems.
Step 5: Leave Developing Pink Buds Undisturbed
Pink buds are already a sign that the plant has entered its reproductive stage. At this point, protecting the buds is more useful than attempting to stimulate additional growth through heavy feeding.
Maintain stable light, moisture and room temperatures.
Avoid frequent rotation of the pot, major changes in position or unnecessary repotting.
Do not handle the buds or repeatedly bend the branches to inspect them.
As long as the plant remains healthy, allow the buds to mature at their natural pace.
Step 6: Postpone Unnecessary Fertiliser
A Thanksgiving cactus already in bud generally does not require an immediate application of organic powder or concentrated fertiliser.
Many established holiday cacti perform well with feeding during active growth and reduced fertilisation during autumn and winter.
If the plant has recently been fertilised, newly purchased or grown in a pre-fertilised potting mix, adding extra nutrients may offer no benefit.
Keep your normal care routine consistent while the plant blooms.
Step 7: Assess the Plant After Flowering
Once the flowers have finished and the plant begins returning to active vegetative growth, reassess its overall condition.
Look for firm segments, new green tips and a potting mix that drains properly.
If the plant is growing normally, decide whether it needs any supplemental feeding based on the age of the potting medium, previous fertiliser use and the appearance of new growth.
A healthy plant does not need fertiliser every time it is watered.
Step 8: Apply Optional Worm Castings During Active Growth
If you choose the organic method, select fully processed worm castings intended for container use.
Check the package for the manufacturer’s recommended application quantity. Use a light top-dressing rather than creating a thick, compact layer.
Keep the material away from the crown and lower stem joints. Distribute it over the exposed potting mix without burying the lower segments.
Do not shake or sprinkle the material onto the buds or green stems.
Water when the potting mix requires it, allowing the soil surface and drainage to remain functional.
Record the application date so you can avoid unnecessarily repeating the treatment.
Step 9: Use a Liquid Fertiliser Instead if Preferred
For gardeners who prefer a measurable nutrient programme, choose an appropriate balanced houseplant fertiliser.
Prepare the dilution exactly as specified for the selected product and its intended use.
Apply during active growth at the recommended interval, accounting for any fertiliser already present in the potting mix.
Avoid adding both a full liquid fertiliser treatment and additional organic nutrients without considering the total nutrient supply.
Step 10: Monitor New Growth and Root Conditions
Over the following weeks, observe whether the plant produces new segments and maintains its normal firmness.
Healthy new growth is generally more meaningful than an immediate change in segment colour.
Watch for persistent wilting despite wet soil, sour-smelling potting medium or unexpected segment loss.
These symptoms deserve investigation before further fertiliser applications.
Do not remove the plant from its pot solely to check roots if it is otherwise healthy and flowering normally.
Step 11: Repot Only When Necessary
If the roots have clearly outgrown the pot, drainage has deteriorated or the growing medium has broken down, repotting may be helpful.
For a healthy flowering plant, spring or early summer after blooming is generally the preferred time.
Choose a container only modestly larger than the existing root system. An oversized pot holds a large volume of unused wet medium.
Use fresh, airy potting mix and gently settle the plant at its previous planting depth.
Water appropriately after repotting, allow drainage and avoid adding unnecessary fertiliser while the roots settle.
Step 12: Maintain a Simple Observation Routine
Check soil moisture, light exposure and the condition of the developing segments regularly.
A quick inspection is more valuable than repeatedly applying products without knowing what the plant needs.
Keep notes about the flowering season, bud formation, fertiliser applications and changes in indoor conditions.
These observations can help you adjust care for future flowering cycles.
7. Watering Thanksgiving Cactus Without Root Rot
How Often Should Thanksgiving Cactus Be Watered?
There is no universal watering schedule that suits every Thanksgiving cactus. A plant growing in a small terracotta pot near a warm window may need watering more frequently than the same plant in a plastic container in a cool room.
Pot size, root density, potting mix structure, temperature and seasonal growth all influence how quickly moisture is used.
During active growth, water when the upper portion of the potting mix begins to dry. During flowering, avoid allowing the entire root ball to become severely dry.
After flowering, when growth slows, the plant may need less frequent watering.
In every season, the growing medium should drain effectively and should never remain saturated for extended periods.
Why Terracotta Changes the Watering Routine
Unglazed terracotta absorbs some water from the potting mix and allows moisture to evaporate through its porous walls.
This can be helpful in humid growing conditions, but it also means that small pots may dry quickly.
Check the soil directly instead of assuming that a regular weekly watering day will always be appropriate.
Remember that the top of a terracotta pot may appear dry even while deeper areas retain moisture.
Signs of Underwatering
- Segments becoming thinner or less firm.
- A noticeably lightweight container.
- Potting mix pulling away from the sides of the pot.
- Dryness extending through much of the root zone.
- Flower buds shrivelling or dropping during a prolonged dry period.
These symptoms are not exclusive to underwatering. Damaged roots can also prevent a plant from absorbing water even when the soil is wet.
Always check moisture before deciding what to do.
Signs of Overwatering
- Potting mix remaining wet for an unusually long time.
- Soft, declining segments despite frequent watering.
- A persistently unpleasant smell from the growing medium.
- Darkened or mushy tissue near the plant base.
- Unexpected segment loss combined with very wet soil.
If these warning signs are present, stop adding fertiliser and assess drainage and root condition.
When root rot is suspected, repotting into suitable fresh medium may be necessary, even if it means disturbing the plant during an inconvenient season.
How to Improve Drainage
Start with a container that has proper drainage holes. Use a growing medium containing enough coarse material to maintain aeration.
Avoid compacting the potting mix tightly around the roots.
Do not place a thick layer of stones at the bottom of the pot as a substitute for drainage holes. This does not correct unsuitable drainage and may reduce the useful volume of growing medium.
Always empty water from decorative outer pots after irrigation.
8. Purple Thanksgiving Cactus Segments and Light
Why Are Thanksgiving Cactus Segments Turning Purple?
Reddish-purple pigmentation can develop in Thanksgiving cactus segments in response to environmental conditions, especially stronger sunlight.
The colouring is associated with protective plant pigments. A moderate change in colour does not automatically mean that the plant is unhealthy.
However, the same general appearance can occur alongside stresses such as excessive light, cold conditions or root problems. Nutrient imbalances may also affect colour, but a purple segment alone is not proof of a deficiency.
For this reason, it is better to assess the entire growing environment before choosing a treatment.
When Purple Colouring Is Usually Less Concerning
If the segments remain firm, new growth develops normally and the plant continues producing healthy buds, some red or purple colouring may be compatible with otherwise good plant health.
Older segments can also differ in colour from newly formed growth.
Observe whether the pigmentation remains stable rather than immediately attempting to remove it through fertilisation.
When Purple Colouring Deserves Attention
If the plant develops widespread reddening alongside bleached areas, dry patches, loss of firmness or halted growth, reassess its light and root environment.
Strong direct afternoon sunlight may create more stress than bright filtered light.
Move the plant gradually to a location with softer illumination if excessive sun exposure is suspected.
Do not suddenly move a budding cactus into a dark corner. The aim is to reduce excessive exposure while retaining useful daylight.
Choosing the Best Indoor Window
East-facing window: Often an excellent option, providing gentle morning sunshine and brighter daytime conditions without intense afternoon exposure.
North-facing window: May work in a naturally bright home, but some windows provide insufficient light for strong growth and reliable flowering.
South-facing window: Can provide excellent brightness when harsh direct sunlight is filtered appropriately.
West-facing window: May need a sheer curtain or additional distance from the glass during strong afternoon sunshine.
The compass direction alone does not determine whether a position is suitable. Nearby buildings, trees, window size and seasonal conditions also matter.
Should You Buy a Grow Light for Thanksgiving Cactus?
An indoor grow light can be useful in rooms with limited natural daylight, particularly during dark winters.
Choose a plant grow light that provides suitable brightness without generating excessive heat close to the segments.
A full-spectrum LED grow light with adjustable height and a reliable timer is often convenient for shelves and indoor plant stands.
Start with the manufacturer’s positioning guidance. Watch the plant for signs of excessive intensity, such as bleaching or increased stress pigmentation.
Most importantly, remember that Thanksgiving cactus depends on seasonal dark periods to initiate flowering. A grow light left on late into the evening can disrupt that process.
During normal growth, an appropriate daytime lighting period can be useful. During autumn bud initiation, ensure that the plant receives long, uninterrupted nights.
Can a Grow Light Replace Natural Daylight?
A properly selected grow light may provide much of the light required for healthy indoor growth.
Nevertheless, brightness, distance, duration and spectral characteristics all influence its effectiveness.
For a Thanksgiving cactus, a daytime light source must also be managed so that nighttime darkness remains uninterrupted during the flowering preparation period.
There is no need to keep the plant illuminated around the clock.
9. Pink Flower Buds and Thanksgiving Cactus Blooming
How Thanksgiving Cactus Produces Flower Buds
Thanksgiving cactus responds to seasonal changes in day length and temperature.
Many varieties begin forming buds when they experience longer uninterrupted nights together with cooler conditions.
Gardeners often encourage flowering by providing approximately 13–14 hours of uninterrupted darkness each night for several weeks, along with appropriately cool nights.
The exact response varies between cultivars and environments. In some cases, cooler temperatures can encourage bud development even without a perfectly controlled lighting schedule.
The most effective approach is to create conditions similar to the plant’s natural seasonal transition instead of applying increasingly strong fertiliser.
Ideal Temperature for Bud Formation
Night temperatures around 55–65°F (13–18°C) are commonly recommended for encouraging holiday cactus flowering.
Once the buds are developing, a reasonably stable indoor environment around 60–70°F (16–21°C) can help support their continued development.
Keep plants away from freezing temperatures, cold draughts and direct blasts of heated air.
Excessive warmth may interfere with bud initiation, while sudden temperature changes can contribute to bud drop.
Why Thanksgiving Cactus Buds Fall Off
Bud drop is one of the most frustrating problems for holiday cactus growers because a plant may appear healthy for weeks before suddenly losing its developing flowers.
Potential triggers include:
- Moving the plant after buds have formed.
- Sudden changes in temperature.
- Cold draughts from doors or windows.
- Excessive heat from radiators or heating vents.
- Allowing the root zone to become severely dry.
- Keeping the potting medium excessively wet.
- Major changes in daylight exposure.
- Root stress caused by inappropriate potting conditions.
Occasional loss of an individual bud is not always evidence of a serious problem. A larger pattern of sudden bud drop deserves closer examination.
How to Protect Pink Buds
The simplest strategy is consistency.
Keep the plant in a suitable location and check the growing medium regularly.
Avoid feeding heavily, repotting or repeatedly handling the branches while the plant is preparing to bloom.
If the plant must be moved to a warmer display room, make the transition carefully and avoid repeated changes.
Once the flowers begin opening, enjoy them where they are rather than continuously rearranging the plant for decoration.
How Long Before Pink Buds Open?
The time from the first visible bud to a fully opened flower varies according to temperature, light, cultivar and bud maturity.
Small newly initiated buds may require several weeks to mature. Large, swollen, richly coloured buds are usually further along in development.
Rather than expecting a particular number of days, watch for the buds gradually increasing in size and showing more distinct flower structure.
A sudden lack of growth combined with shrivelling may indicate that the environment needs attention.
Should You Fertilise While the Cactus Is Blooming?
Established Thanksgiving cacti generally do not require heavy feeding while in bud or flower.
Many horticultural recommendations focus feeding on the active growing season and reduce or stop it as the autumn flowering period approaches.
A well-fed plant can use nutrients already present in its tissues and growing medium during flowering.
Adding extra organic powder during bloom is therefore not necessary simply because the buds are visible.
After the Flowers Finish
Allow faded flowers to fall naturally or remove them gently without damaging nearby segments.
The plant may enter a period of slower growth after flowering.
Reduce watering frequency as needed for its lower water use, while preventing prolonged dehydration.
As fresh growth begins in spring, gradually return to normal active-season watering and consider restarting the appropriate fertiliser programme.
10. Expert Tips for Healthier Thanksgiving Cactus
- Learn the weight of a watered pot. Lift the container carefully after watering and again as the medium dries. The difference helps you recognise moisture changes without relying on a calendar.
- Protect the roots from stagnant water. A healthy root system needs oxygen. Drainage holes and an airy growing medium are essential even when the plant prefers consistent moisture.
- Do not confuse purple colouring with a fertiliser request. Examine light, temperature, segment firmness and moisture before diagnosing nutrient deficiency.
- Maintain stable conditions after buds appear. A beautiful blooming display is more likely when the plant experiences fewer sudden environmental changes.
- Reduce fertiliser before the main flowering season. Support active growth in spring and summer and shift attention towards bud protection in autumn.
- Choose a measured feeding programme. Using the same appropriately labelled fertiliser consistently makes it easier to understand the plant’s response than rotating through several products.
- Use worm castings conservatively. A light, properly applied top-dressing is preferable to covering the entire root zone with a thick layer of fine organic material.
- Keep grow lights on a dependable timer. Reliable daytime illumination is useful, but the plant needs uninterrupted nighttime darkness to support seasonal bud initiation.
- Avoid oversized pots. Thanksgiving cactus often grows well when slightly pot-bound. Large containers can retain excess moisture around a relatively small root system.
- Prune after blooming rather than before. Removing terminal segments immediately before flowering can remove the very points where buds are developing.
- Inspect segment joints for pests. Mealybugs and scale insects can hide along the plant’s branching joints, making early infestations easy to overlook.
- Keep decorative outer pots dry. Empty standing water after irrigation, especially when the actual drainage pot is concealed inside ceramic decoration.
- Use gentle changes rather than dramatic corrections. Gradual adjustments to placement, watering and growing conditions are generally easier for a healthy plant to tolerate.
- Record the annual flowering cycle. Notes about autumn temperatures, light exposure and flowering dates can help you reproduce successful growing conditions in future years.
11. Common Mistakes and Troubleshooting
Mistake 1: Treating Thanksgiving Cactus Like a Desert Cactus
Some gardeners allow the soil to become completely dry for prolonged periods because the plant has cactus in its name.
However, Thanksgiving cactus is adapted to a more humid environment than desert species. Extended dryness during bud development can contribute to bud loss and dehydration.
Better approach: Check moisture regularly and use a potting mix that balances aeration with reasonable water retention.
Mistake 2: Overwatering to Prevent Bud Drop
In an attempt to keep the buds healthy, gardeners sometimes water too frequently.
Wet soil without enough oxygen creates conditions favourable to root decline.
Better approach: Keep moisture consistent without leaving the root zone saturated.
Mistake 3: Adding Too Much Organic Powder
Applying a thick layer of organic material can alter moisture behaviour around the surface of the potting mix.
Some organic amendments may also contain variable nutrient concentrations or soluble salts.
Better approach: Use only suitable, labelled products and avoid excessive top-dressing.
Mistake 4: Assuming Every Purple Segment Needs Fertiliser
Reddish pigmentation may arise from light exposure or other environmental factors. Nutrient deficiency cannot be confirmed from colour alone.
Better approach: Check whether the segments are firm, whether the plant is growing normally and whether its light conditions are appropriate.
Mistake 5: Moving the Plant Repeatedly
Constantly moving a budding cactus between rooms exposes it to changing light, temperatures and humidity.
Better approach: Select a good position before buds develop and maintain it through the flowering period where possible.
Mistake 6: Using an Unsuitable Potting Mix
A dense, compacted medium may hold too much water around the roots.
At the opposite extreme, an exceptionally coarse medium may dry too rapidly in a warm terracotta pot.
Better approach: Choose a well-aerated mix with moderate moisture retention and observe how it behaves under your conditions.
Mistake 7: Repotting During Peak Bloom
Unnecessary repotting can disturb the roots and disrupt a stable environment at a sensitive stage.
Better approach: Postpone routine repotting until after flowering, unless an urgent drainage or root-health problem requires intervention.
Mistake 8: Leaving Grow Lights On at Night
Artificial light during the normal dark period may interfere with the plant’s seasonal response.
Better approach: Use an automatic timer and provide uninterrupted darkness during autumn bud initiation.
Mistake 9: Applying Pest Treatments Without Identifying a Pest
Spraying insecticides or homemade mixtures simply because segments look discoloured can damage the plant without addressing the real cause.
Better approach: Identify the actual pest or problem before choosing a treatment labelled for that use.
Troubleshooting Common Thanksgiving Cactus Problems
Problem: Pink Buds Are Shrivelling
Possible causes: Severe dryness, sudden changes in temperature, root stress or unsuitable environmental conditions.
What to check: Soil moisture, proximity to heating vents, drainage and recent movement.
Recommended action: Correct the relevant environmental problem and return the plant to a stable care routine.
Problem: Segments Are Turning Deep Purple
Possible causes: Increased light exposure, cool conditions or other environmental stress.
What to check: Direct sunlight, temperature, firmness and whether the colour change is accompanied by tissue damage.
Recommended action: Provide bright filtered light and monitor new growth. Investigate root conditions if the plant is also wilting.
Problem: Stem Segments Feel Soft
Possible causes: Underwatering, overwatering, damaged roots or advanced tissue decline.
What to check: Whether the growing medium is extremely dry or persistently wet.
Recommended action: Address the actual moisture or root issue rather than applying fertiliser as an immediate remedy.
Problem: White Crust Appears on the Potting Mix
Possible causes: Mineral deposits from irrigation water or accumulated fertiliser salts.
What to check: Water quality, fertiliser frequency and drainage.
Recommended action: Review feeding and watering practices. When appropriate, flush a healthy, freely draining medium with plain water and allow it to drain thoroughly.
Problem: The Plant Produces Segments but No Flowers
Possible causes: Insufficient darkness, excessively warm autumn conditions or a flowering cycle disrupted by artificial lighting.
What to check: Nighttime illumination, seasonal temperatures and the amount of useful daylight.
Recommended action: Provide an appropriate autumn induction period with cool nights and uninterrupted darkness.
Problem: Tiny Cotton-Like Clusters Appear at the Joints
Possible cause: Mealybugs are a common possibility.
What to check: Look closely at segment joints, hidden stems and nearby plants.
Recommended action: Isolate the affected plant where practical, identify the pest and follow an appropriate labelled treatment programme.
Problem: Small Brown Bumps Appear on Segments
Possible cause: Scale insects, particularly when bumps are accompanied by sticky residue.
What to check: Whether the bumps are attached insects rather than natural corking or surface marks.
Recommended action: Identify the pest and use manual removal or an appropriately labelled houseplant treatment where suitable. Repeat applications only as directed.
Problem: The Potting Mix Smells Sour
Possible causes: Poor drainage, decomposing organic material or unhealthy root conditions.
What to check: Persistent wetness, blocked drainage and signs of stem decline.
Recommended action: Investigate the root environment, improve drainage and replace unsuitable potting mix when necessary.
12. Optional Thanksgiving Cactus Growing Variations
Variation 1: Organic Growing with Worm Castings
Use a good-quality organic container potting mix and a small, label-directed application of commercial worm castings during active growth.
Monitor the medium’s moisture and avoid adding more organic material than the small root system requires.
This method suits gardeners who prefer a gradual, organic approach, although nutrient content is less standardised than a conventional fertiliser.
Variation 2: Balanced Liquid Feeding Programme
Use a suitable water-soluble houseplant fertiliser during spring and summer.
Follow the product’s dilution directions and feeding frequency. Reduce applications as flowering approaches.
This variation may appeal to gardeners who prefer more precise nutrient management.
Variation 3: Terracotta Windowsill Display
Grow the plant in a natural clay container positioned near a bright window.
The warm terracotta colour complements green and burgundy segments, while the porous pot requires careful moisture monitoring.
Variation 4: Ceramic Decorative Planter
Keep the cactus in a draining nursery pot and place it inside an elegant decorative ceramic container.
Remove the inner pot for watering and allow excess water to drain before replacing it.
This provides design flexibility without compromising drainage.
Variation 5: Hanging Holiday Cactus
A mature Thanksgiving cactus develops branching stems that can eventually arch and cascade.
A hanging planter can showcase the plant’s shape and seasonal flowers.
Choose a secure hanger, a suitable drainage system and a location with accessible watering.
Variation 6: Indoor Grow Light Shelf
Use a full-spectrum LED grow light on a plant shelf where natural daylight is inadequate.
Adjust the brightness and duration to the plant’s needs, and maintain long nights during autumn flowering preparation.
Variation 7: Propagation from Stem Cuttings
After flowering, take healthy cuttings containing two or three connected segments.
Allow the cut ends to dry briefly, then place them in lightly moist, airy propagation medium.
Keep them warm and in bright indirect light. Rooting may take several weeks, depending on conditions.
A rooting hormone is optional rather than essential for many healthy Thanksgiving cactus cuttings.
13. Decorative Planters and Luxury Indoor Styling
Natural Terracotta and Warm Wooden Shelves
The rich earthy colour of terracotta creates an appealing contrast with green Thanksgiving cactus segments and bright pink buds.
A wooden shelf near a bright window can create a warm, relaxed atmosphere while allowing the plant enough natural light.
This combination works particularly well in rustic, Mediterranean and botanical interior designs.
Choose a shelf strong enough to support the weight of the watered container and provide enough room for the branches to grow naturally.
Minimalist White Ceramic Pots
A white ceramic outer planter provides a clean background for the plant’s distinctive foliage and seasonal flowers.
Glossy white finishes suit contemporary interiors, while matte ceramics can complement natural wood and neutral furnishings.
For the best practical result, use a draining inner pot so the roots never remain in collected water.
Premium Stoneware Planters
Textured stoneware in muted cream, charcoal or sand tones can make a mature Thanksgiving cactus feel like a carefully selected decorative feature.
The plant’s purple-tinged segments become especially interesting when displayed against restrained neutral colours.
Choose the planter for durability, proportion and drainage practicality rather than appearance alone.
Indoor Plant Stands
A plant stand can lift the cactus closer to an appropriate window and allow older stems to arch over the container’s edge.
Stands made from metal, hardwood or bamboo can suit different interior styles.
Avoid placing the plant where people regularly brush against its branches or where heating equipment creates dry, hot air.
Grouping Thanksgiving Cactus with Spider Plants
Spider plants provide long, narrow, arching leaves that contrast with the Thanksgiving cactus’s broad segmented stems.
The pairing can create an attractive indoor display, especially when both plants receive appropriate filtered light.
Keep them in separate containers so their individual watering needs remain manageable.
Seasonal Autumn Decoration
Thanksgiving cactus naturally suits autumn decor because its flowering season often coincides with cooler days and holiday gatherings.
Use neutral ceramic accessories, small decorative pumpkins or subtle botanical arrangements around the pot.
Do not cover the growing medium with heavy decorative materials that interfere with watering, air exchange or drainage.
Elegant Holiday Table Centrepiece
A flowering Thanksgiving cactus can make a beautiful temporary centrepiece.
Choose a stable container and keep the plant away from candles, heat sources and direct draughts.
Because moving a budding cactus can encourage bud loss, it is usually better to plan the display location before the buds develop or wait until flowers begin opening.
Bright Bathroom Plant Display
Where natural light is sufficient, a bright bathroom can provide a relatively humid environment that suits tropical houseplants.
However, a bathroom without adequate daylight is not automatically suitable simply because it has high humidity.
Ensure proper airflow and avoid leaving water standing in decorative pots.
14. Ongoing Care and Seasonal Maintenance
Spring: Encourage Healthy New Growth
Spring is often the beginning of a more active growing period for Thanksgiving cactus.
Watch for fresh green stem segments and gradually adjust watering as the plant begins using more moisture.
This is generally a good time to consider repotting an overcrowded plant, refreshing deteriorated potting mix or taking propagation cuttings.
If the plant is healthy and actively growing, restart a measured fertiliser programme according to the selected product’s directions.
Summer: Maintain Growth and Root Health
Continue providing bright filtered light and check moisture more frequently during warm weather.
Outdoor summer growing may be possible in a sheltered, shaded position once temperatures are suitable.
Avoid harsh midday sun, very dry exposure and conditions that could allow the roots to become waterlogged.
If you use liquid fertiliser or organic amendments, keep applications moderate and note the dates.
Inspect the plant regularly for scale insects, mealybugs and other common houseplant pests.
Early Autumn: Prepare for Bud Formation
As days shorten, reduce unnecessary fertiliser applications.
Provide the plant with long, uninterrupted nights and appropriately cool nighttime conditions.
Keep the daylight location bright without exposing the plant to excessive direct sunshine.
It is particularly important to avoid artificial lighting late into the night if you are trying to encourage seasonal flowering.
Late Autumn: Protect Developing Buds
Once pink buds appear, maintain the plant’s position as consistently as practical.
Check the soil regularly so the roots do not experience severe dryness or prolonged saturation.
Avoid repotting, heavy feeding and unnecessary handling.
Protect the plant from sudden draughts and excessive heat.
Winter: Enjoy Flowers and Adjust Watering
Allow flowers to open naturally and enjoy the seasonal display.
Keep the plant in appropriate filtered light and continue monitoring moisture.
After flowering, water less frequently if growth slows and the potting mix takes longer to dry.
Do not force new growth with fertiliser while the plant is resting.
Repotting and Root Monitoring
Thanksgiving cactus can remain in the same container for several years when its roots are healthy and the potting mix remains suitable.
Repot when roots have clearly outgrown the container, the soil structure has deteriorated or drainage problems make replacement necessary.
A new pot should generally be only slightly larger than the existing root system.
Use fresh potting mix and avoid burying the lower stem segments too deeply.
Holiday and Short-Absence Care
If you will be away for a few days, assess the soil moisture before leaving rather than watering automatically.
Keep the plant away from intense heat and consider whether its location will remain stable while you are absent.
For a longer absence, arrange for someone to check the plant’s actual moisture needs rather than following a fixed watering instruction regardless of conditions.
Do not leave a flowering cactus standing in a permanently filled saucer.
Safe Storage of Fertilisers and Tools
Store all gardening fertilisers, soil amendments and pest treatments in their original labelled packaging.
Keep them away from food preparation areas and out of the reach of children and pets.
Clean reusable tools after handling unhealthy plant material and follow the protective equipment requirements of any selected treatment.
15. Frequently Asked Questions
1. What is the best fertiliser for Thanksgiving cactus?
A balanced houseplant fertiliser suitable for container plants is a practical choice during active growth. The correct product, dilution and frequency depend on its label and the plant’s growing conditions. Heavy feeding is not necessary for reliable flowering.
2. Can I put brown organic powder on a Thanksgiving cactus?
Some labelled brown organic amendments, including commercially processed worm castings, can be suitable for container plants. Use them only according to the product’s instructions and preferably during active growth. Do not assume every brown powder is a fertiliser.
3. Are worm castings good for Thanksgiving cactus?
Worm castings can be a useful optional organic soil amendment when applied lightly to an appropriate potting medium. They are not essential, and excessive applications should be avoided.
4. Should I fertilise Thanksgiving cactus when pink buds appear?
Usually, the better approach is to protect the developing buds through stable light, temperature and watering. Routine feeding is generally concentrated in the active growing season and reduced as flowering approaches.
5. Why does my Thanksgiving cactus have purple segments?
Reddish-purple colouring can develop under stronger light or other environmental conditions. Examine the plant’s firmness, exposure and root health before assuming it needs fertiliser.
6. Can purple Thanksgiving cactus segments turn green again?
Some stress-related pigmentation may lessen after the growing environment improves. However, the degree of colour change depends on the tissue, age of the segments and underlying cause. Existing discoloration is not guaranteed to disappear.
7. Is Thanksgiving cactus the same as Christmas cactus?
No. Thanksgiving cactus generally refers to Schlumbergera truncata, which has pointed, claw-like segment margins. Christmas cactus commonly refers to related plants with more rounded segments, particularly Schlumbergera × buckleyi. Cultivated hybrids can make identification more complicated.
8. What soil is best for Thanksgiving cactus?
A high-quality, freely draining indoor potting mix that retains moderate moisture is ideal. Perlite and small orchid bark can improve aeration where necessary.
9. Can I use regular cactus soil?
Yes, if it provides adequate moisture retention as well as drainage. Extremely fast-drying desert cactus mixes may need adjustment for the roots of this tropical epiphytic species.
10. How often should I water a Thanksgiving cactus?
Water according to the condition of the potting mix rather than a fixed schedule. During budding, avoid severe dryness while allowing the upper medium to begin drying between waterings. Always empty excess drainage water.
11. Why are Thanksgiving cactus buds falling off?
Common triggers include sudden changes in light or temperature, cold draughts, excessive heat, underwatering and overwatering. Assess recent environmental changes before treating the plant.
12. How do I make my Thanksgiving cactus bloom?
Provide bright indirect daylight and a seasonal period of long, uninterrupted nights with appropriately cool temperatures. Healthy roots and consistent moisture support the plant once buds develop.
13. How many hours of darkness does it need?
Many Thanksgiving cactus varieties respond well to approximately 13–14 hours of uninterrupted darkness during the autumn flowering induction period. Exact requirements can vary with cultivar and temperature.
14. Can I move a Thanksgiving cactus while it has buds?
Moving it is sometimes unavoidable, but repeated or abrupt changes may increase the risk of bud drop. Keep conditions as consistent as possible and avoid unnecessary relocation.
15. Does Thanksgiving cactus like direct sunlight?
Bright indirect light is generally preferable. Gentle morning sun may be tolerated, but strong direct afternoon sunlight can cause stress or scorch the segments.
16. Is terracotta better than plastic for Thanksgiving cactus?
Both can work. Terracotta allows more evaporation, whereas plastic retains moisture longer. Choose according to the potting mix and environment, and ensure the pot has drainage holes.
17. Can Thanksgiving cactus grow under LED lights?
Yes, suitable indoor LED grow lights can support growth. Adjust light intensity and position carefully, and maintain uninterrupted dark periods when encouraging flower buds.
18. Why is my cactus growing new segments but not flowers?
The plant may be receiving adequate conditions for vegetative growth but insufficient long nights or cool temperatures to initiate buds. Review autumn lighting and temperature conditions.
19. When should I repot Thanksgiving cactus?
Spring or early summer, after flowering, is generally suitable. Repot only when the roots or potting medium genuinely need attention rather than automatically replacing the container every year.
20. Can I propagate Thanksgiving cactus from cuttings?
Yes. Healthy cuttings containing several connected segments can be rooted in an airy, lightly moist propagation medium. Bright indirect light and suitable warmth support establishment.
21. Do Thanksgiving cactus cuttings need rooting hormone?
Rooting hormone is optional for many healthy cuttings. If used, select a product labelled for the intended propagation method and follow its directions rather than inventing a powder quantity.
22. Should I add coffee grounds to the pot?
Fresh coffee grounds are not a reliable substitute for balanced fertiliser and may alter the surface texture or moisture behaviour of a small container. Properly processed, labelled amendments are easier to use responsibly.
23. Why are the segments wrinkled even though the soil is wet?
Wet soil combined with wrinkled or limp segments may indicate impaired water uptake caused by unhealthy roots. Check drainage and root condition before adding more water or fertiliser.
24. How long can a Thanksgiving cactus live?
Holiday cacti are capable of surviving for many decades under appropriate conditions. Some established plants are maintained and shared across generations.
25. Can Thanksgiving cactus flower more than once per year?
Some plants produce additional flowers when suitable light and temperature conditions occur again. Repeat flowering is possible, but not guaranteed.
16. Complete Thanksgiving Cactus Care Card
Plant Information
Plant: Thanksgiving cactus.
Botanical name: Schlumbergera truncata.
Category: Tropical epiphytic flowering cactus.
Care method: Consistent bud-stage care with optional organic or balanced fertiliser during active growth.
Plant quantity: One established plant.
Preparation time: Approximately 5–10 minutes.
Routine hands-on care: Approximately 5–15 minutes per check or maintenance session.
Season: Autumn and winter for flowering care; spring and summer for most active-growth feeding.
Light: Bright, indirect daylight.
Flowering temperatures: Generally around 60–70°F (16–21°C), with cooler autumn nights supporting bud initiation.
Potting mix: Moisture-retentive, freely draining indoor potting medium.
Container: A pot with drainage holes.
Expected response: Buds continue developing over a variable period of days to weeks depending on maturity and conditions; new vegetative growth develops mainly during active growing periods.
Recommended Supplies
- One healthy Thanksgiving cactus in a suitable container.
- Clean water for irrigation.
- A well-draining houseplant potting mix.
- A drainage saucer that can be emptied after watering.
- A suitable bright location with stable conditions.
- Optional: labelled, fully processed worm castings for light application during active growth.
- Alternative to worm castings: an appropriate balanced houseplant fertiliser, prepared and applied according to its label.
- Optional for future repotting: fresh indoor potting mix, perlite and small orchid bark.
Care Instructions
- Inspect the segments, developing buds and potting medium for visible changes.
- Place the plant in bright indirect light with protection from extreme temperatures.
- Check the upper potting mix before watering.
- Water thoroughly when required and allow excess water to drain.
- Maintain relatively consistent moisture while flower buds are developing.
- Avoid heavy fertiliser, unnecessary repotting and repeated movement during flowering.
- After flowering, allow the plant to adjust naturally to its next growth stage.
- During healthy active growth, select either an appropriate balanced fertiliser programme or an optional light application of labelled worm castings.
- Follow product-specific instructions rather than assuming an application rate.
- Monitor new segment growth, drainage and overall plant firmness.
- Repot after flowering if the root system or potting medium genuinely requires replacement.
- Provide long, uninterrupted nights and cooler temperatures during the next autumn flowering preparation period.
Optional Fresh Potting Mix
For repotting when necessary, a suggested starting blend is two parts indoor potting mix, one part perlite and one part small-grade orchid bark, measured by volume.
Adjust this mixture according to the water retention of the base medium and the plant’s environment.
Important Aftercare Notes
Do not diagnose nutrient deficiency from purple pigmentation alone.
Avoid thick organic top-dressings that interfere with moisture management.
Keep the lower stem joints clear of accumulated growing medium.
Protect developing buds from sudden changes in location, light and temperature.
Keep fertilisers and treatments in their original labelled containers.
Useful Hashtags
#ThanksgivingCactus #HolidayCactus #Schlumbergera #ThanksgivingCactusCare #HouseplantCare #CactusFlowers #IndoorGardening #PlantFertiliser #OrganicGardening #FloweringHouseplants
17. Share Your Thanksgiving Cactus Growing Experience
A mature Thanksgiving cactus with pink flower buds and richly coloured segments can become one of the most memorable plants in an indoor garden.
Whether you prefer a natural terracotta pot, an elegant ceramic planter, a balanced liquid fertiliser or a gentle organic feeding programme, the most important goal is to understand what your plant needs at each stage of its growing cycle.
Have you noticed purple segments on your Thanksgiving cactus? Does yours produce bright pink, red, orange or white flowers? Share your experiences and favourite growing tips with other plant lovers.
Save this guide for the next flowering season and follow along for more practical houseplant care, indoor gardening inspiration, potting mix advice and seasonal flower-growing tips.
With suitable light, thoughtful watering, healthy roots and consistent seasonal care, your Thanksgiving cactus can remain a beautiful part of your home for many years.
18. Additional Gardening References
For readers interested in further horticultural guidance, the following university extension resources provide useful information about holiday cactus identification, watering, feeding, flower development and organic amendments.
- North Carolina State University Extension — Schlumbergera truncata. Botanical identification, growing requirements, flowering characteristics and common problems.
- University of Minnesota Extension — Holiday Cacti. Growing conditions, fertilisation, bud development and propagation.
- Iowa State University Extension — All About Holiday Cacti. Watering, seasonal flowering requirements, repotting and troubleshooting.
- Penn State Extension — Holiday Cacti Care. Indoor cultivation, potting conditions and propagation advice.
- Oregon State University Extension — Composting with Worms. Guidance on using properly prepared vermicompost as a container-plant amendment.
- Cornell Cooperative Extension — Give Your Holiday Cactus Some Love. Seasonal growing conditions and practical care for flowering holiday cacti.